
Smart Connections
Find related notes from the current note, an exact block, the note footer, or an Obsidian Base. The Connections view and Footer connections are included in Core and remain available when Pro is active. Inline connections and Connections in Bases require Pro.
Start with Getting started with Smart Connections. Open the Connections view. Complete one note-first discovery. Then use the detailed controls below.
In this guide
- Find related notes in Obsidian with Smart Connections (Core and Pro)
- Find related notes beside the text you are writing (Pro)
- Show related notes at the bottom of an Obsidian note (Core and Pro)
- Tune Smart Connections scoring and ranking (Pro)
- Rank Obsidian Bases rows by semantic relevance (Pro)
Find related notes in Obsidian with Smart Connections
Edition: Core and Pro.
The Connections view is note-anchored semantic discovery: while auto-refresh is running, the current note determines the related notes or blocks shown beside it.
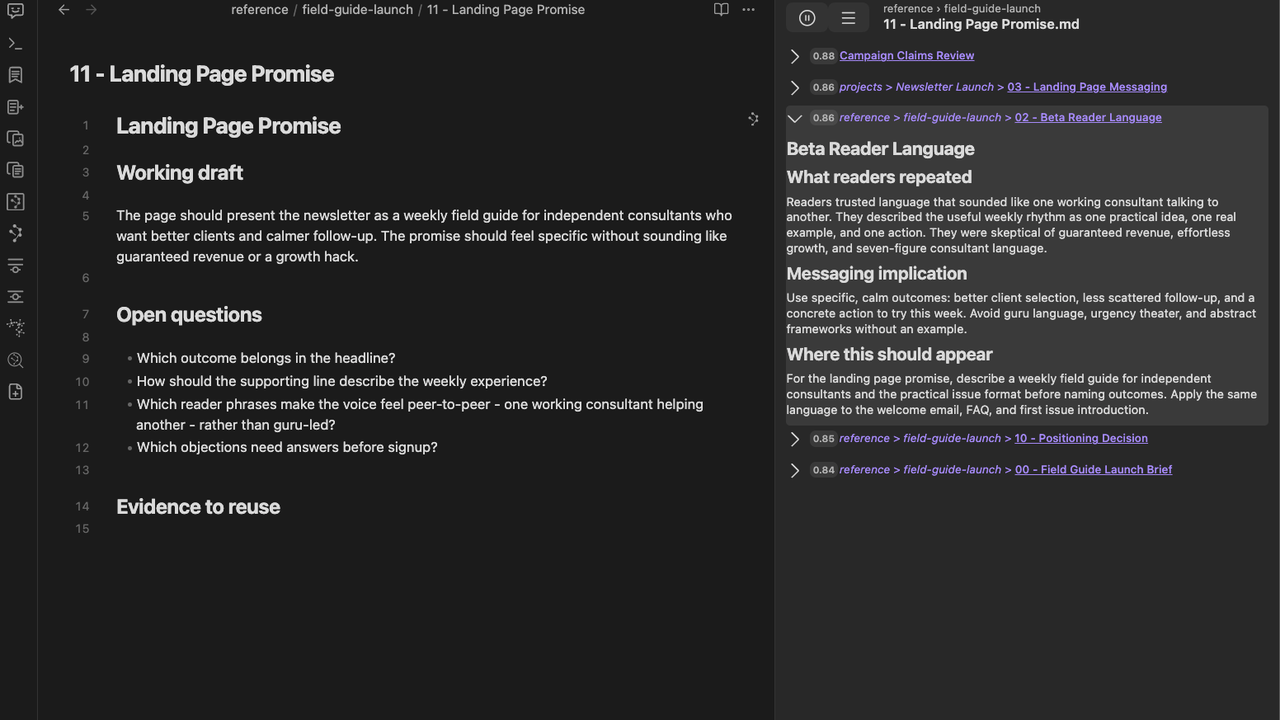
A note-first example captured in Pro 4.8.1: Landing Page Promise supplies the context, and Beta Reader Language is available to inspect without a typed query. The current note does not link to that source. The passage, not its score, is the evidence to evaluate.
The ranked list is the primary workflow. Graph style is one choice: None hides the graph; selecting a component makes it visible above the results. The result list remains available. Core includes the 2D similarity map; Pro adds two semantic neighborhood styles. These are Connections presentations, not the separate Smart Graph product.
Use the populated list to choose a result to inspect. Scores are relative signals, not a guarantee that a source is useful.
Open the Connections view
Open the Command Palette. Run the command for your installed edition:
- Core:
Smart Connections: Open: Connections view - Pro:
Smart Connections Pro: Open: Connections view
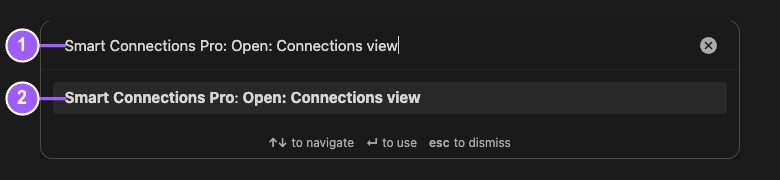
What the numbers identify:
- The full Pro command in the Command Palette search field.
- The matching Open: Connections view command ready to run.
Core uses the same command suffix under the Smart Connections prefix.
The Smart Connections ribbon action opens the same Connections view when that entry is available. Run the command or select the ribbon action. Wait for the populated Connections view.
The default view uses the active note as the reference source and updates when that source changes while auto-refresh is running.
When should I use Smart Lookup instead?
Use Lookup when a question or typed idea should determine the results. Use Connections when the current note is the anchor.
Auto-refresh and fixed-target behavior
When the active-state menu offers Pause auto-refresh, active-note changes drive the result set. Select Pause auto-refresh when one reference note must remain fixed while you open or compare results.
If the list appears stuck after changing notes, examine the auto-refresh menu state. If auto-refresh is paused, use the available resume action.
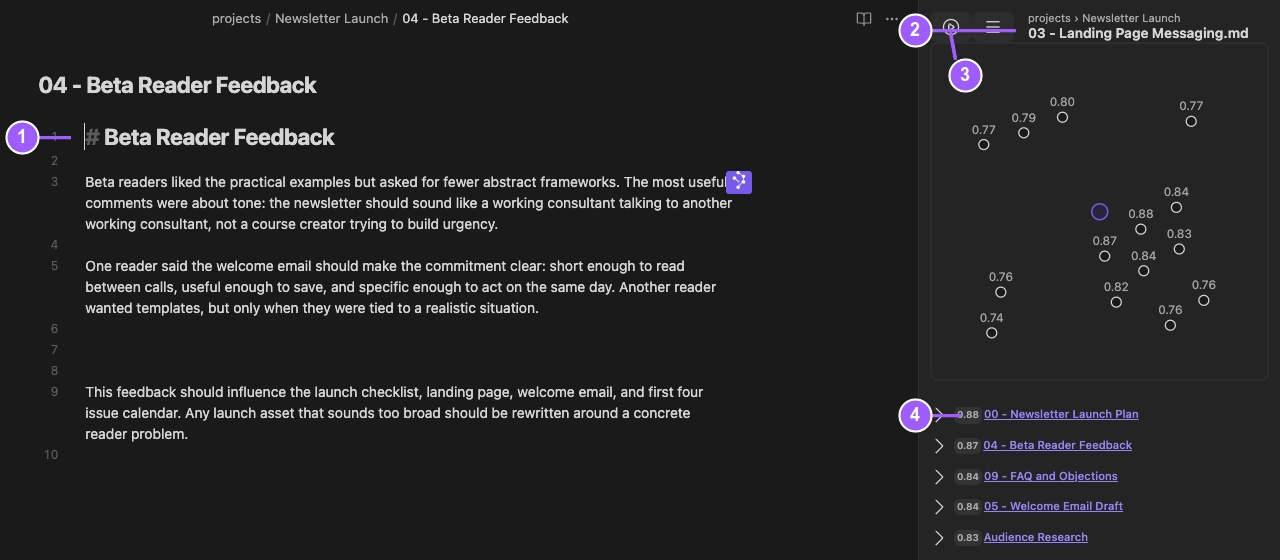
What the numbers identify:
- Beta Reader Feedback is open in the editor.
- Landing Page Messaging remains the fixed Connections target.
- The play control resumes auto-refresh.
- The ranked result set remains attached to the fixed target.
The target stays fixed while another note is open. Resume auto-refresh when you want results to follow the active note again.
Why did the list change when I opened a result?
The Connections view follows the active note while auto-refresh is running. Select Pause auto-refresh before opening results when one reference note must remain fixed.
Drop an item anywhere in Connections to change the target
Drop one indexed note or block anywhere inside the live Connections view. Valid drop areas include the top bar, target label, graph, result list, and background.
The target menu groups recently used notes under History and heading or line-range targets under Blocks. Changing the target does not change whether result rows use Sources or Blocks.
Accepted sources include a File Navigator note and a Connections, Lookup, or graph result. The view rerenders around the dropped target.
Folders, unindexed items, ambiguous paths, and multi-item drops are rejected because one Connections view has one target.
Refresh connections
Refresh connections recomputes results for the current reference note.
Use it after substantial note edits, a settings change, or a stale result state.
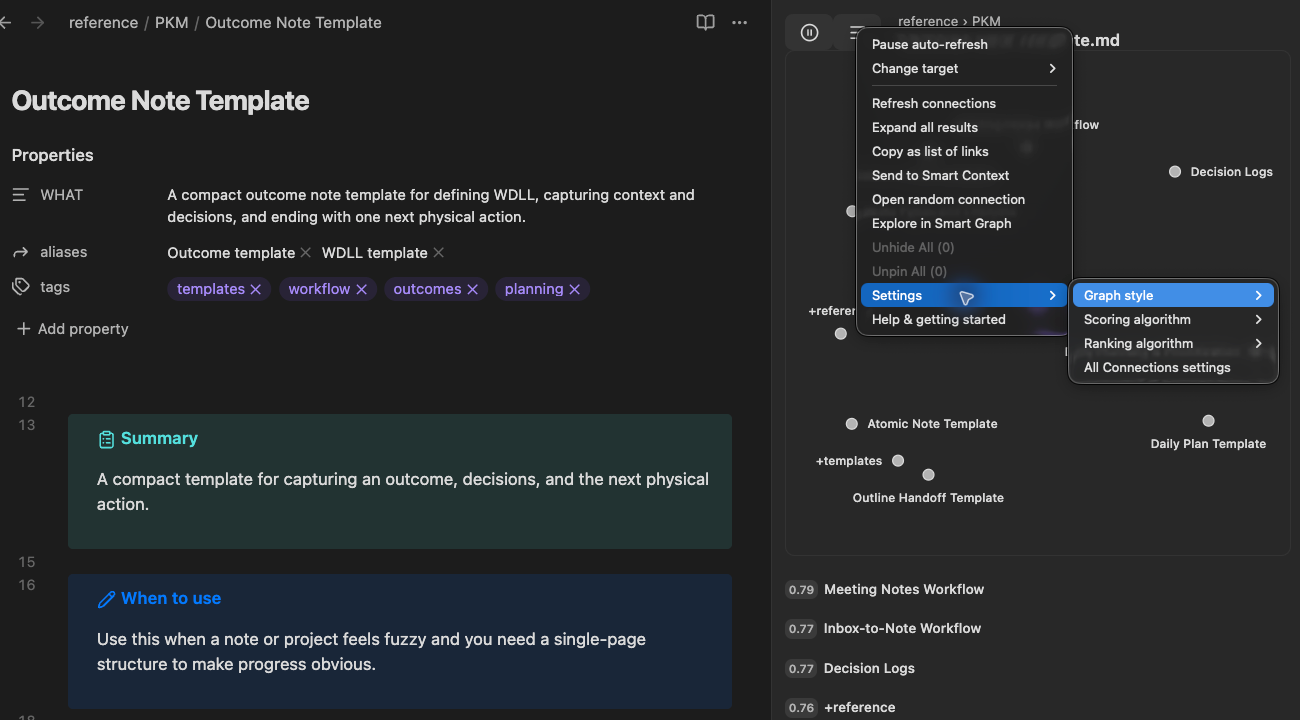
The current menu keeps refresh, copy, and handoff actions at the top level. Configuration is grouped under Settings:
- Settings > Graph style chooses None or a graph component.
- Settings > Scoring algorithm selects the Pro primary-score method.
- Settings > Ranking algorithm selects the Pro final-ordering method.
- Settings > All Connections settings opens the complete settings page.
Pro 4.8.3 menu availability, before any action is chosen. Review the current target and result set before choosing an action.
Send to Smart Context requires Smart Context. Explore in Smart Graph requires Smart Graph. Scoring and ranking controls require Connections Pro. Check the Store when a handoff is unavailable.
Explore these results in Smart Graph
Use More actions > Explore in Smart Graph to continue with the current target and its related sources in the separate Smart Graph plugin. The handoff deduplicates source identities; it is a bounded results scope, not a whole-vault graph or a new typed search.
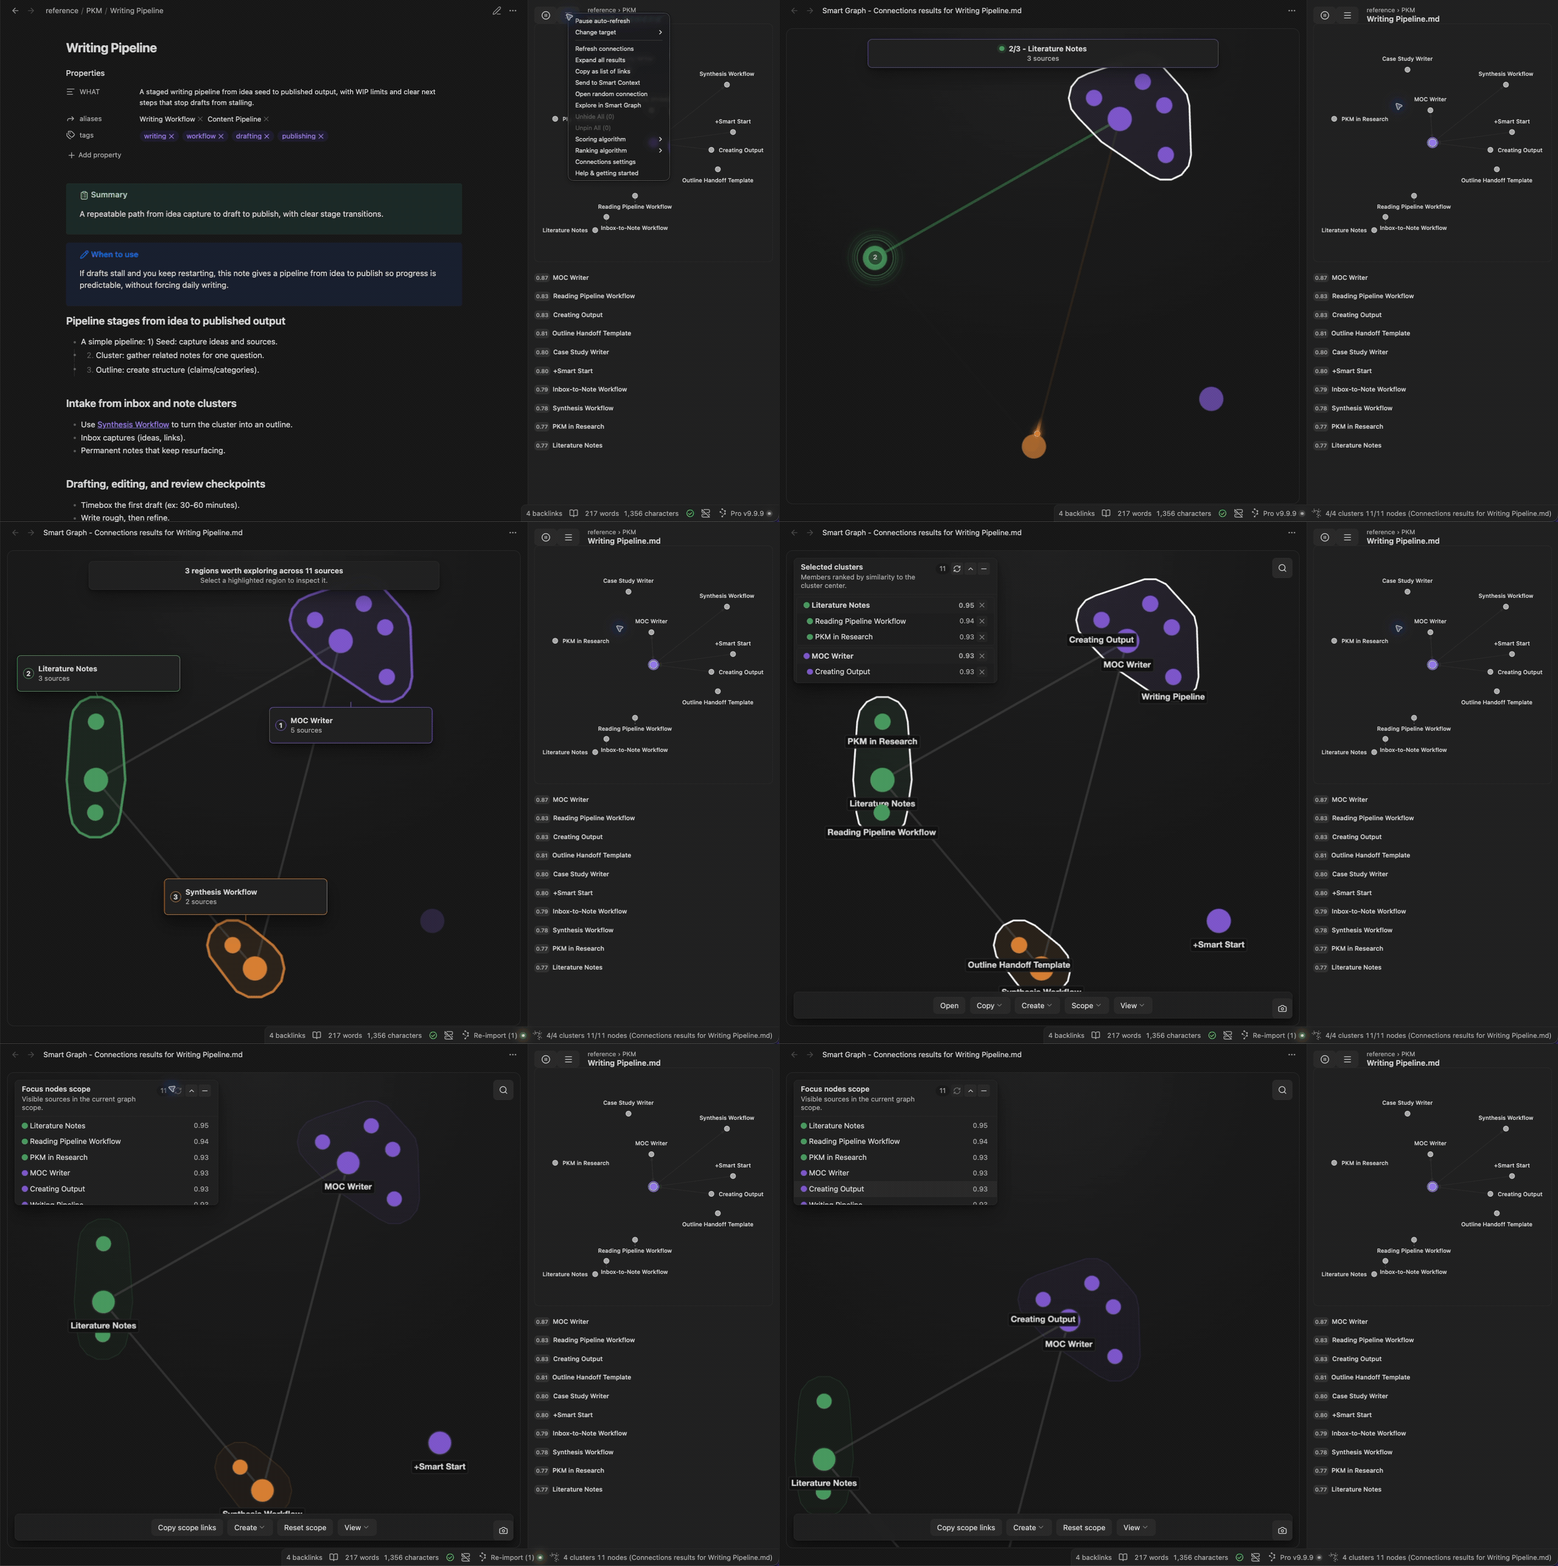
The continuous walkthrough shows:
- Explore in Smart Graph opens the current context.
- The opening semantic cascade runs automatically, then leaves 11 nodes: Writing Pipeline plus its ten related sources.
- Clear current selection clears selection without changing that eleven-node scope.
- Clicking Creating Output in Notes focuses its graph node. It does not open the source note.
Captured with Connections Pro 4.8.2 and Smart Graph Pro 1.2.2. This is the complete action-to-inspection run; the animation does not establish clustering accuracy or source relevance.
Read result rows
Each row represents a related Smart Source or Smart Block.
A row can show:
- source or block label
- path or heading context
- relative connection score
- expand/collapse state
- pinned or hidden feedback state where applicable
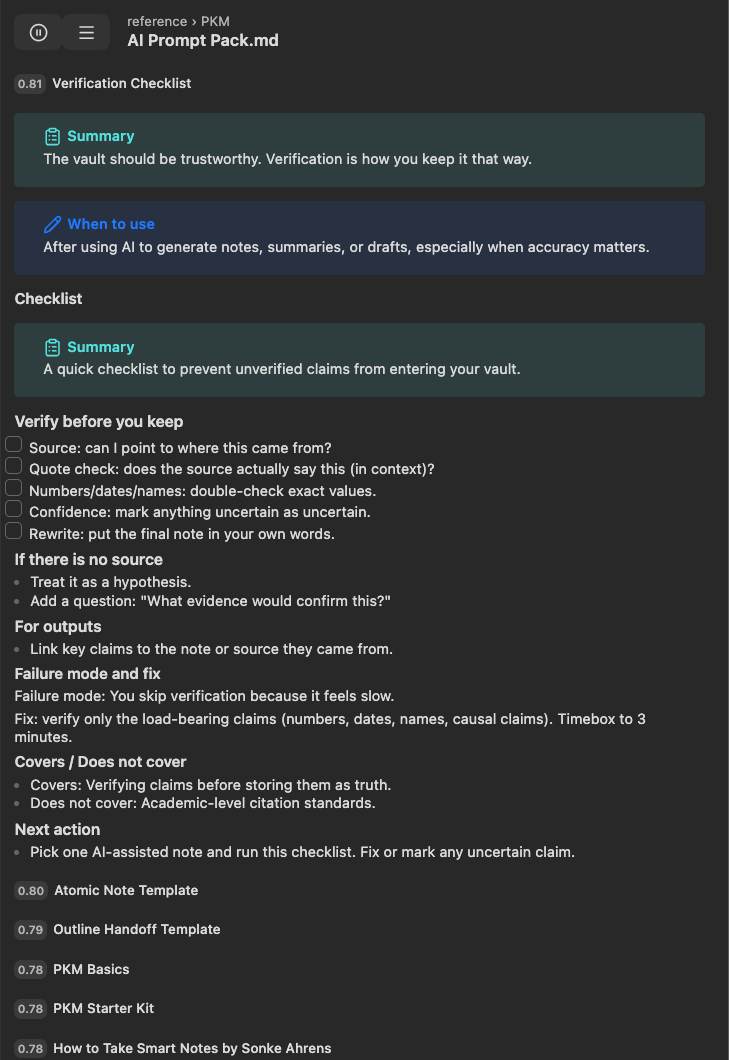
Pro 4.8.2 source-review example: AI Prompt Pack remains the target while Verification Checklist exposes source text in the Latest presentation. The graph is hidden. Show formatted text renders the source's Markdown; turning it off presents plain text without editing the note.
The score is relative to this result set. Expand the row to inspect the source before deciding whether to use it.
Expand and collapse a result
Expand a result to inspect more source content without opening the note.
Expand all results and Collapse all results apply the same presentation state to the visible rows.
Hover preview
On desktop, hold Cmd/Ctrl while hovering a result to use Obsidian Hover Preview.
Preview lets you confirm relevance without changing the active note or the list anchor.
Open a result
Clicking a result follows Obsidian's default link behavior:
- Click: open in the current pane.
- Cmd/Ctrl + click: open in a new tab.
- Cmd/Ctrl + Alt + click: open in a new pane or split.
Drag a result into a note or another Smart Plugin
Drag a result to:
- a Markdown editor to create an Obsidian link (Core and Pro)
- Smart Chat to add it to the current response context (requires Smart Chat)
- an existing named-context dashboard row to curate it into that saved context (requires Smart Context)
- Smart Graph to add its indexed source to the current graph scope (requires Smart Graph)
- the live Connections view to make it the single current target (Core and Pro)
Use the editor route when a suggested relationship should become an authored relationship in the current note.
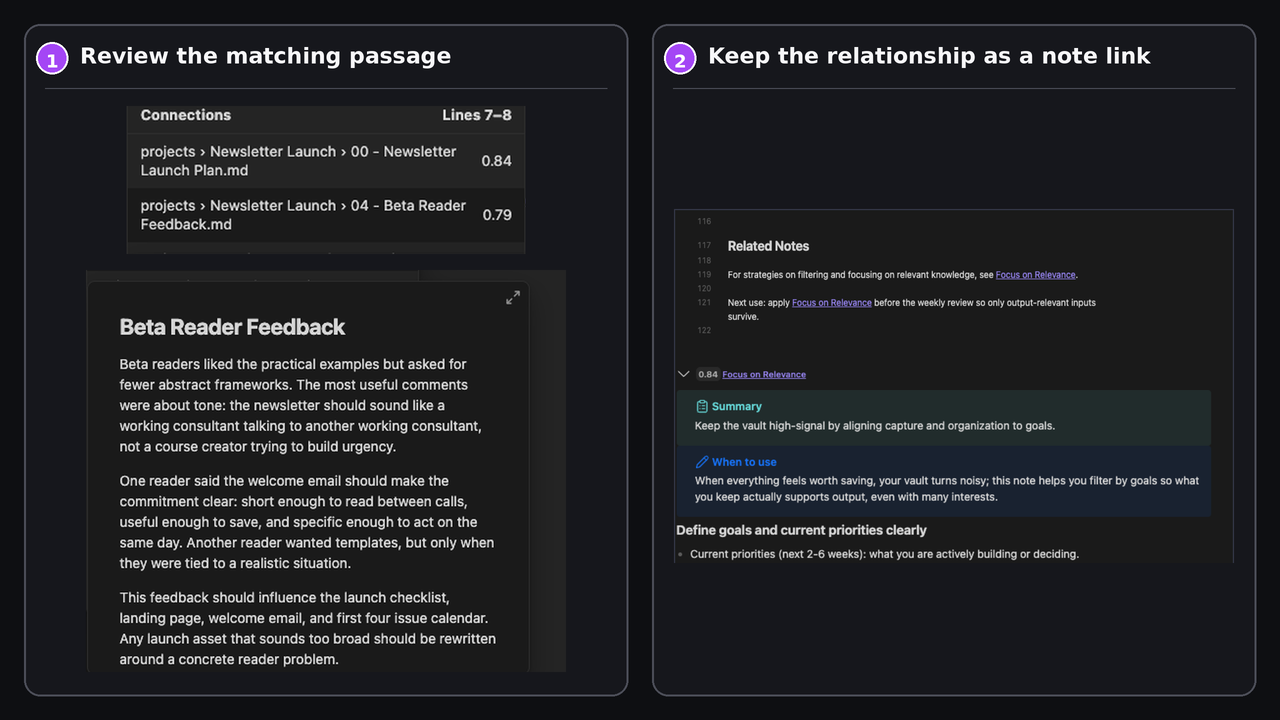
The preview supports the decision. The inserted Obsidian link makes the reviewed relationship durable.
Copy as a list of links
Copy as list of links copies the current result set as Obsidian links.
The output is suitable for a Related section, reading trail, project hub, or review note.
Send to Smart Context
Send to Smart Context opens a reviewable context set from the current Connections results.
Remove noisy results before copying or using the set in an AI workflow.
This action requires Smart Context. If Context is unavailable:
- Open the Smart Plugins Store.
- Install Smart Context if it is not installed.
- Enable Smart Context if it is disabled.
- If the Store shows Reload required, complete that action.
- Return to Connections.
After sending results, open Smart Context. Make sure that the source identities are correct before you copy or send them onward.
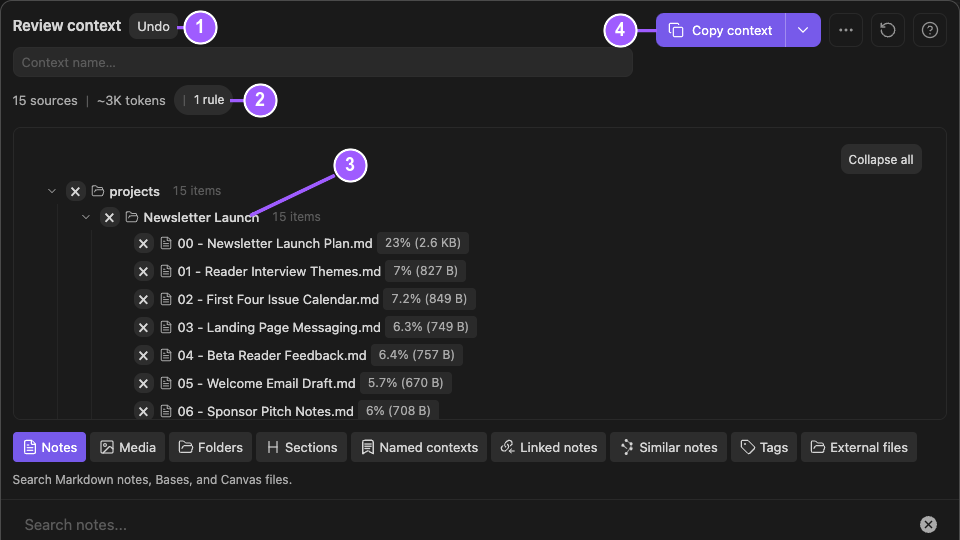
What the numbers identify:
- Undo reverses the handoff before you copy or send the reviewed set onward.
- The summary reports 15 sources, the estimated token size, and one rule.
- The expanded Newsletter Launch tree preserves the transferred source hierarchy and names.
- Copy context is available after review.
Sending results creates a reviewable source set. Confirm the identities before copying or sending it onward.
Hide a result
In the Latest result style, use the row's Mark as not relevant thumbs-down control to hide that connection. It removes the result from the visible list, not the source note.
- Identify the result before acting. Here, Beta Reader Feedback appears at 0.84 under Landing Page Messaging.
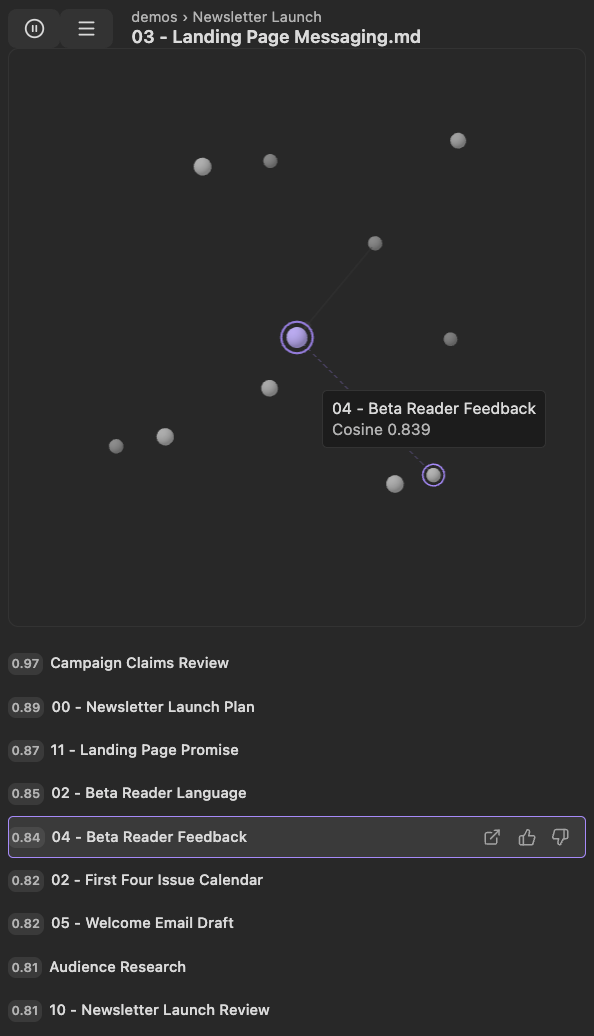
- After the action, the native Connection hidden. notice offers Undo.

- The result is absent from the settled list, and the root menu offers Unhide All (1).
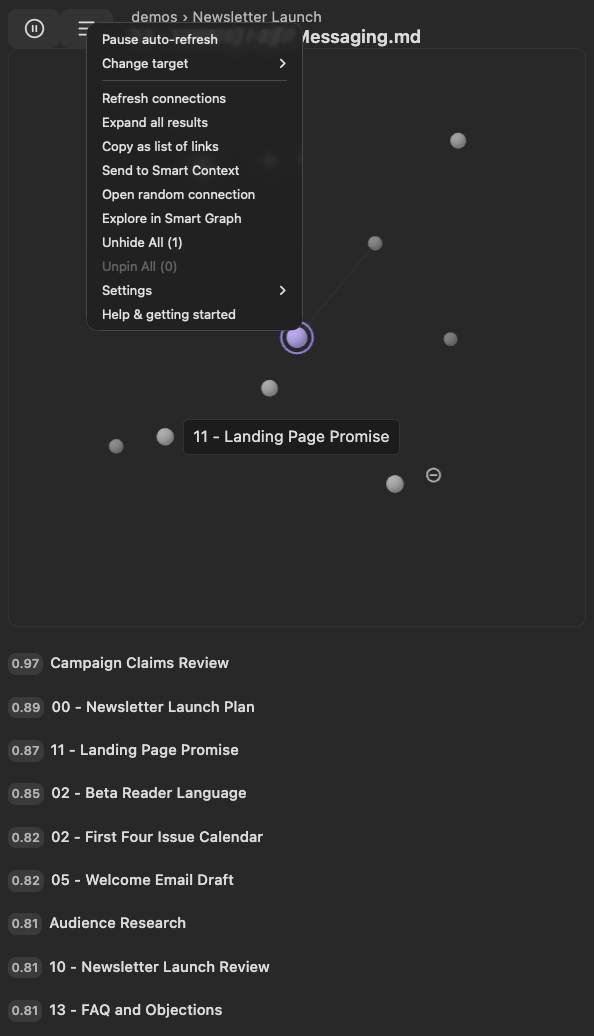
Pro 4.8.3, one matched run with Cosine Similarity and ranking None. The native notice confirms hiding; this example does not demonstrate feedback-aware ranking or persistence after reload.
Unhide All (n) reports the current hidden-result count and is available when there are hidden results. After using it, refresh the same target and make sure that the intended results return. In Pro, hidden feedback can also affect feedback-aware scoring when one of those algorithms is selected.
Pin a result
Pin keeps an important result at the front of the list.
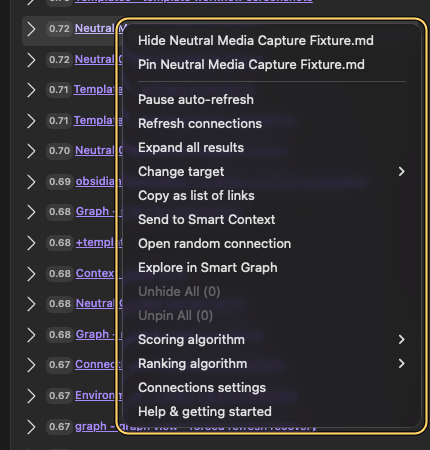
Earlier result-menu presentation. The current Latest feedback controls are shown above.
Pinned results remain at the front while still showing a score for the current reference note.
The root list menu exposes Unpin All (n), where n is the current pinned-result count. Its enabled or disabled state shows whether a bulk reversal is available. After using it, refresh the same target and make sure that the intended pin state appears.
Interpret connection scores
The score is a relative ranking signal for the current result list.
- Compare scores inside the same list.
- Do not treat the score as an absolute grade.
- Preview or open the source before using it.
- Score ranges vary by model, candidate pool, and algorithm.
Does a high score mean the notes should be linked?
No. It means the result ranked highly for the current comparison. Add a link only after the relationship helps the note.
Choose whole-note Sources or smaller Blocks
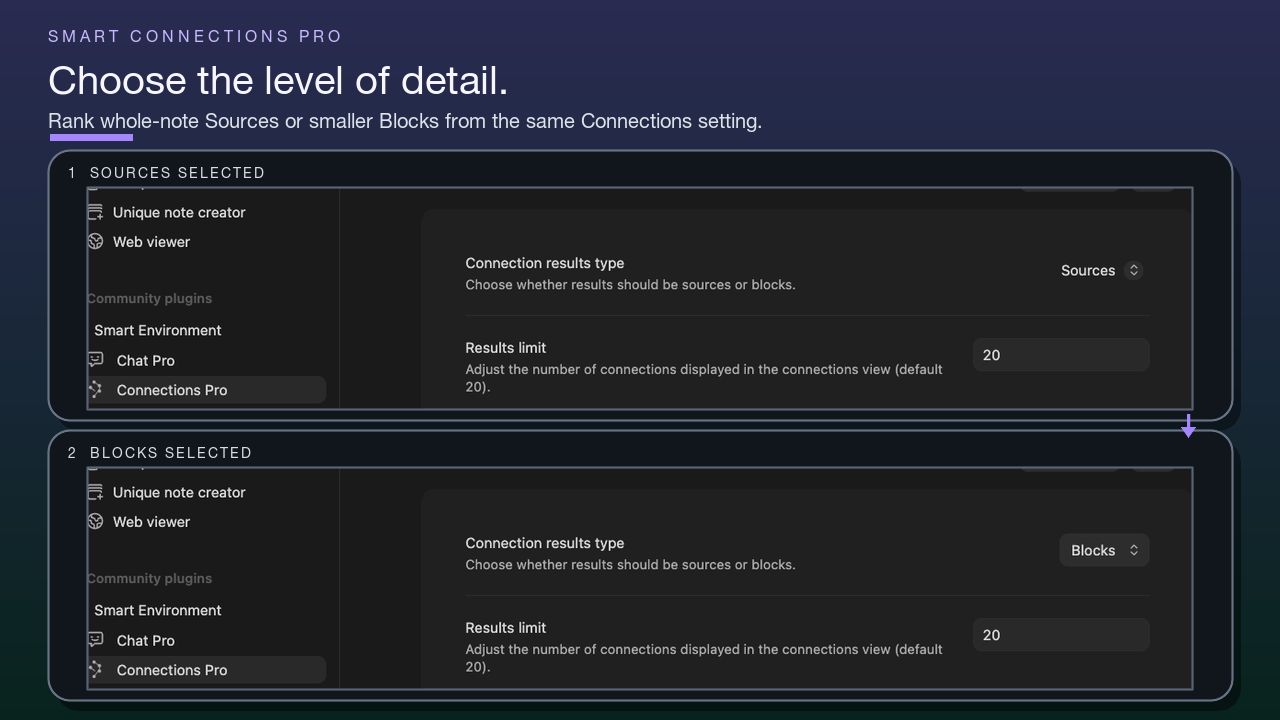
Sources returns whole-note candidates. Blocks returns heading or block candidates.
Start with Sources for broad discovery. Use Blocks when long notes hide the useful section.
Hide notes already linked from the current note
Edition: Pro.
Use Exclude outlinks when the current note already links to sources that should not be suggested again. This setting filters the displayed Connections list. It does not delete links, remove notes from the vault, or change Smart Environment indexing scope.
Workflow:
- Start from a note that links to one or more current Connections results.
- Open Connections Pro settings.
- Enable Exclude outlinks.
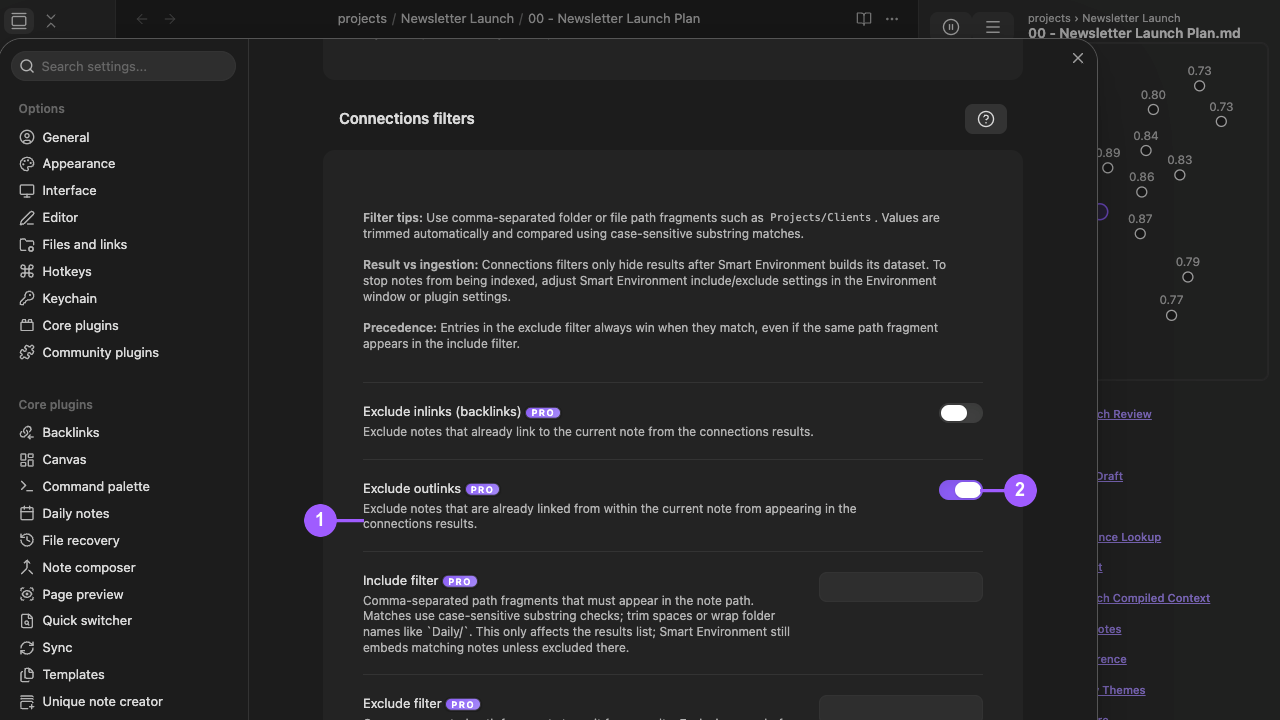
What the numbers identify:
- The description limits Exclude outlinks to displayed Connections results. It does not change Smart Environment indexing.
- The enabled toggle applies that display filter to the current anchor.
After enabling it:
- Return to the same anchor.
- Make sure that linked notes are absent.
- Make sure that unrelated results remain.
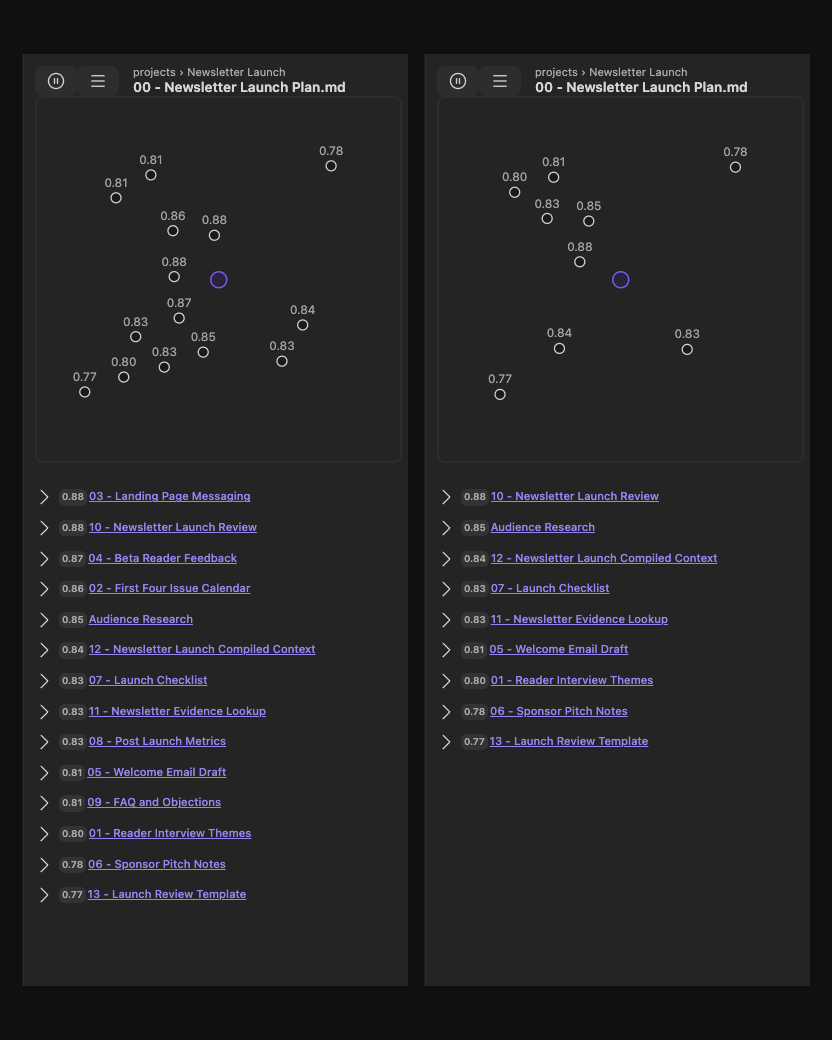
Disable Exclude outlinks when you want linked notes to be eligible again.
See the filter explanation for the control and comparison steps.
Troubleshoot empty or stale results
Use the smallest recovery that matches the state.
| State | First check |
|---|---|
| Empty on a tiny note | Open a note with enough meaningful text. |
| Not updating | Confirm auto-refresh is running. |
| Stale after edits | Use Refresh connections. |
| Smart Environment not loaded | Select Load Smart Environment. Wait for Smart Environment ready or Ready. |
| Embedding paused | Open the status view. Select Resume embedding. |
| One expected note missing | Keep the note active. Select Inspect active note from the status menu. |
| Several expected notes missing | Select Show stats from the status menu. Alternatively, select Environment stats from the status view. Check source eligibility. Check the current embeddings. |
| Queued re-import work | Open the status view. Select Run re-import. |
| Broad or noisy | Tune result type and limits first. Use Pro filters or scoring only after one useful result is confirmed. |
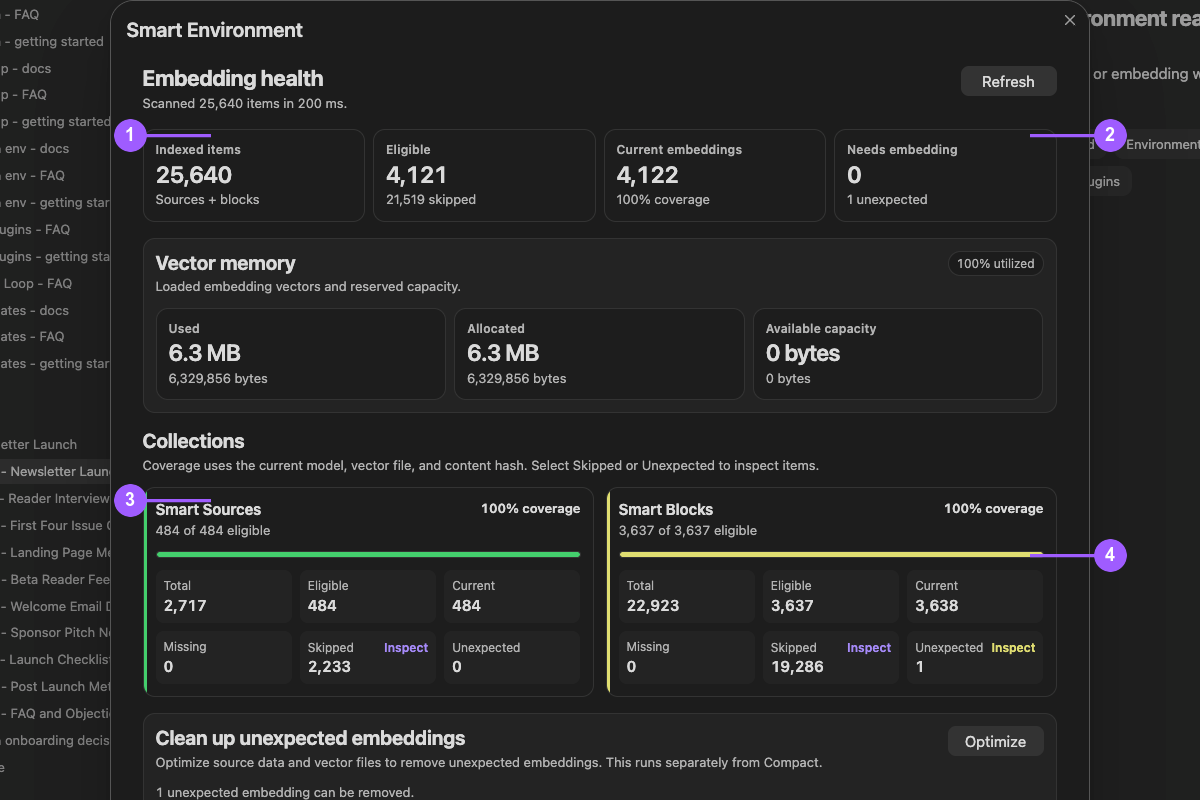
What the numbers identify:
- Total indexed items.
- Remaining and unexpected embedding work.
- Smart Sources eligibility and current coverage.
- Smart Blocks eligibility and current coverage.
Coverage shows preparation status. Relevance still depends on the active note and Connections settings.
Inspect one active note with Source Inspector
When one meaningful note is unexpectedly missing:
- Keep that note active.
- Choose Inspect active note from the Smart Environment status menu.
- In Source Inspector, make sure that the note is eligible.
- Make sure that its required Smart Source or Smart Block state is current.
- Correct its inclusion or content before you change Connections Pro ranking controls.
Are similar results duplicates?
Not necessarily. Use Smart Dedupe when repeated material needs side-by-side review.
Connections sidebar behavior
The sidebar owns active-file refresh, pause state, folding, settings access, and visibility recovery.
Auto-open behavior
New installations can open the Connections sidebar automatically so the first results are visible.
Existing workspaces retain normal Obsidian view persistence.
Active-file refresh
While auto-refresh is running, the sidebar refreshes when the active note changes.
The view also updates after Refresh connections and relevant Connections-list settings changes.
Fixed-target behavior
Pause auto-refresh keeps the current reference source while the active editor changes.
While auto-refresh is paused, active-note changes do not refresh the list.
Why are results still anchored to an older note?
Auto-refresh may be paused. Turn it back on from the same control to resume active-note updates.
Settings gear
The gear control opens the relevant Connections settings.
From the Connections menu, use Settings > All Connections settings for the full page, or choose Graph style, Scoring algorithm, or Ranking algorithm within the Settings submenu for that control.
Settings changes that affect list filters trigger a result refresh.
Expand or collapse all results
The root list menu shows Expand all results or Collapse all results, depending on the current row state. These actions change the expanded state of visible result rows without changing the result set.
Sidebar visibility recovery
When the sidebar is hidden, it defers refresh work. When it becomes visible again, it updates if the active note changed and auto-refresh is running.
Why did the sidebar not update while it was hidden?
Hidden views defer unnecessary work. The pending source is checked when the view becomes visible again.
Choose a Connections graph style
Open the Connections menu and choose Settings > Graph style, or use Display > Graph style in Connections settings. Select None to hide the graph, or select a component to show it. There is no second visibility switch to enable.
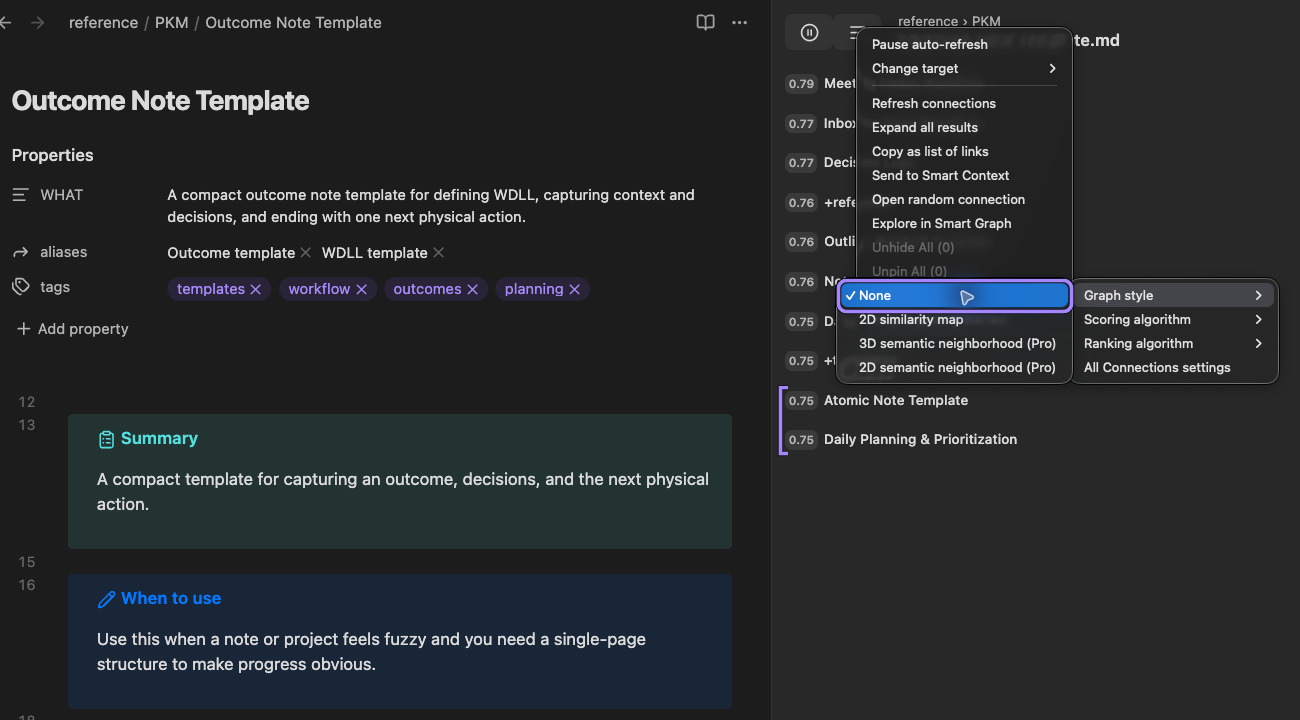
In this Pro 4.8.3 capture, None is selected and the graph is hidden. The same ten source identities, scores, and order were retained. The menu naturally overlaps part of its parent; the full Settings route is shown above.
| Graph style | Edition | Use it to |
|---|---|---|
| None | Core and Pro | Keep related results without a graph. |
| 2D similarity map (Classic) in Core; 2D similarity map in Pro | Core and Pro | Scan temporary groups in the current result set. |
| 2D semantic neighborhood (Pro) | Pro | Identify named candidates around the current-note center. |
| 3D semantic neighborhood (Pro) | Pro | Orbit the neighborhood and inspect a candidate against its result row. |
The three graph components show the current Connections candidates, including applicable pinned or hidden feedback. They are not whole-vault graphs. Graph style None changes presentation, not result eligibility or ranking; a different display does not make a relevance score more accurate.
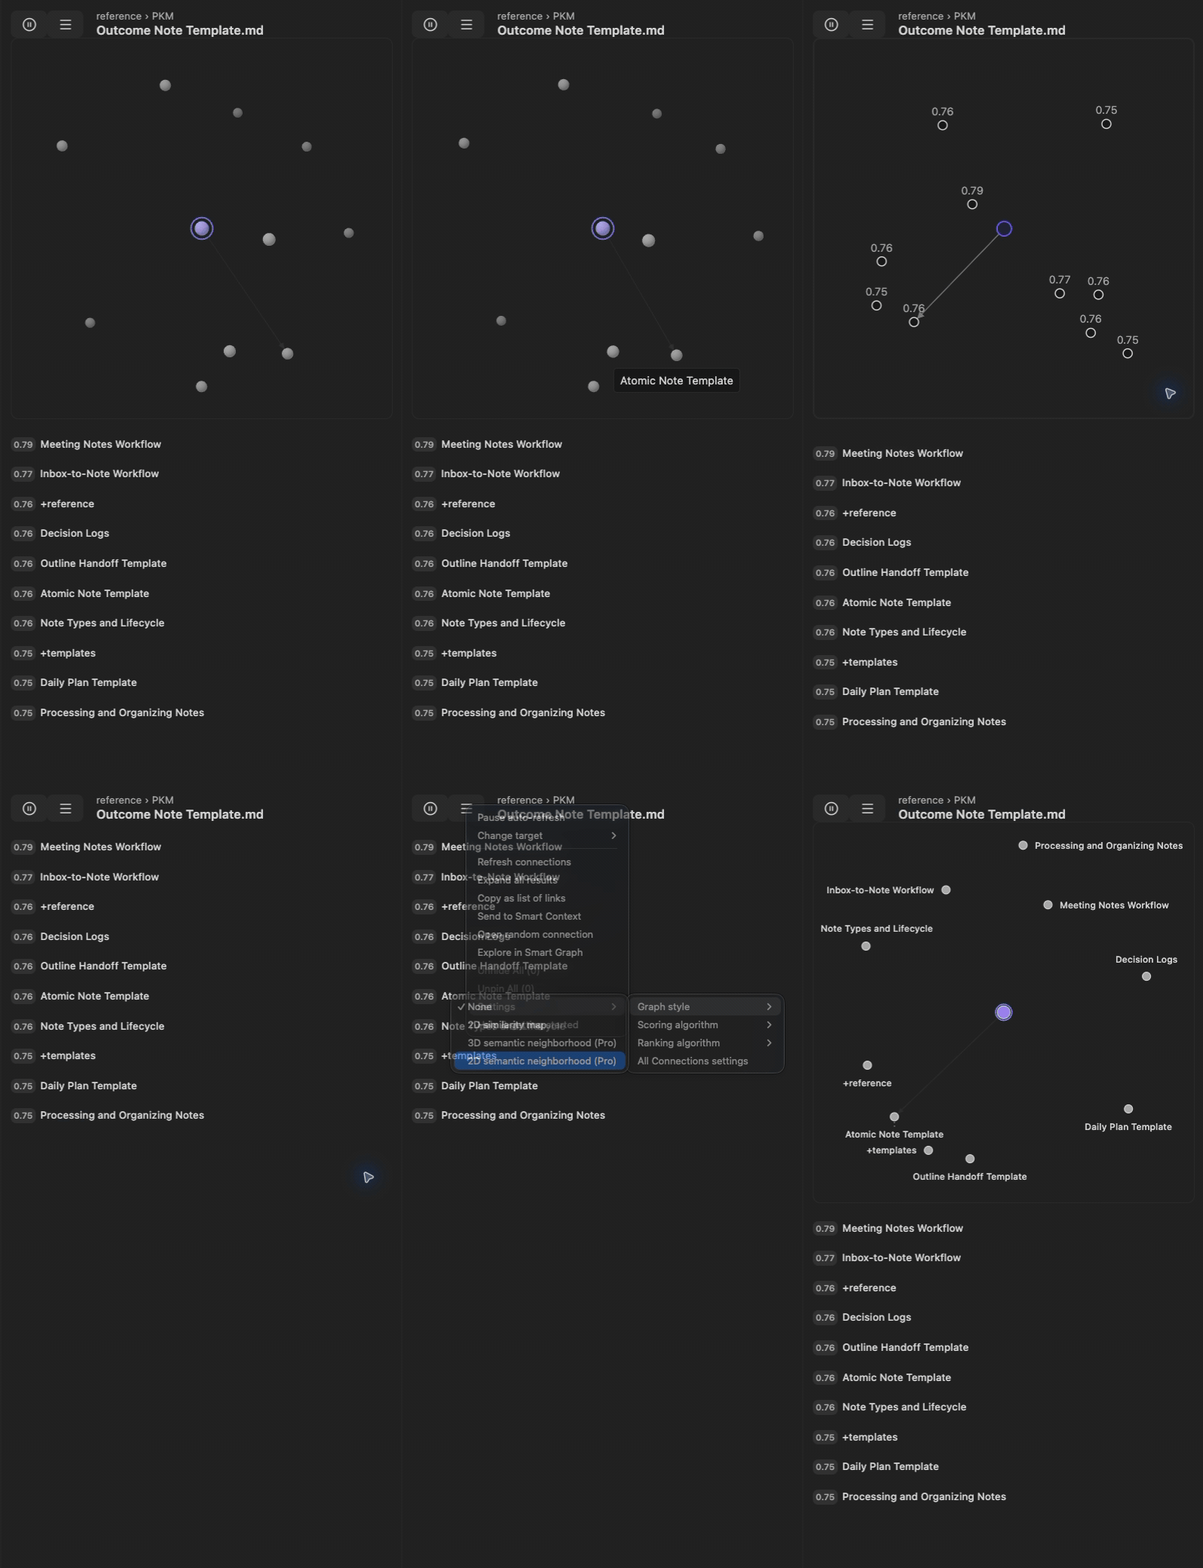
This 13.5-second Pro 4.8.3 recording starts with visible 3D rotation, selects 2D similarity map and None, then ends on the new 2D semantic neighborhood. None hides only the graph; the candidates, scores, and order stay fixed throughout. After None, the main Connections menu > Settings > Graph style restores the graph. The loop restarts from the new 2D ending to the 3D opening. This is a separate capture run from the still examples above.
2D similarity map
The 2D similarity map is the Connections graph style included in Core. Select it instead of None to show the current candidate set above the ranked result list. It is not the separate Smart Graph product.
Choose Graph style in the surface you are configuring. The sidebar and Footer have separate component choices, and choosing None for one does not require hiding the other. Footer configuration does not change Connections codeblocks.
Use the 2D similarity map to scan the result set. Then use the list to open a source. Review the source before you keep the relationship.
Connections graph
The graph displays the current Connections result set as nodes arranged around temporary semantic groups. Use it to examine the shape of the results. Then use the list to review a source. Act on the source only after this review.
Node states
Pinned results use the Connections accent treatment. Hidden results remain visible as muted nodes so prior feedback is still recognizable in the graph.
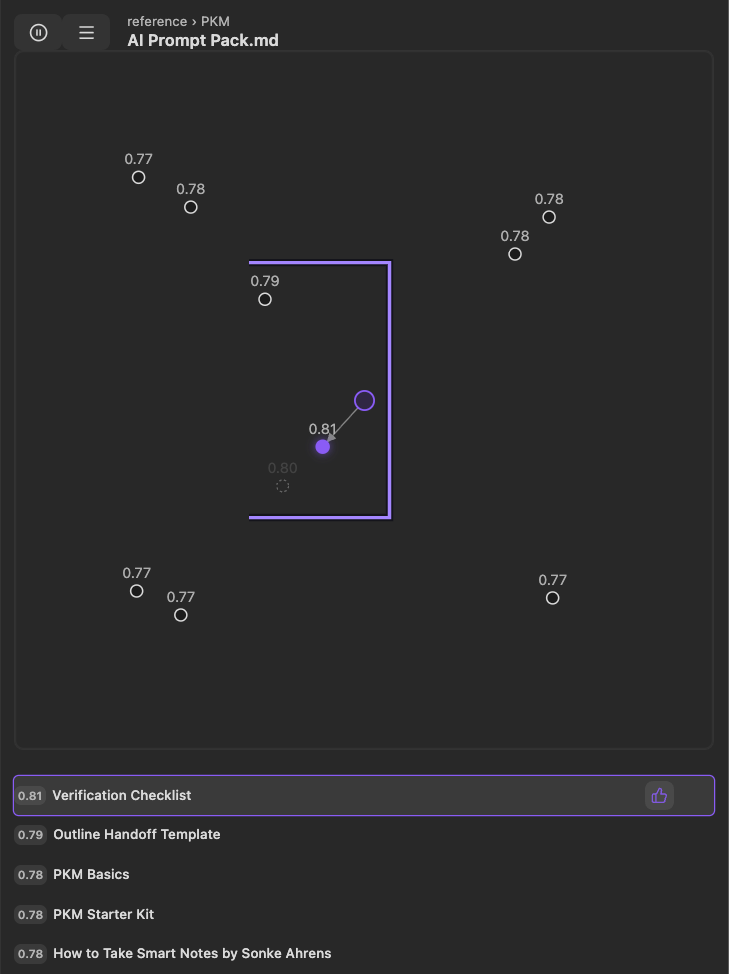
Pin and Hide feedback remain distinguishable in the map. A retained hidden node is not a visible result row or an endorsement of the source.
Why can a hidden result still appear?
The graph can keep it as a muted node so prior feedback remains visible.
Graph lines
Semantic guide lines are exploratory signals, not authored links. In Pro, the graph's Show note links action displays arrows for existing note links. Hide note links removes that overlay without deleting links or changing the result set.
Right-click the graph for Hide note links or Show note links and Graph style. The graph menu has no separate Show graph action; None belongs to Graph style. No separate note-link setting is shown in the Display capture with 2D semantic neighborhood selected.
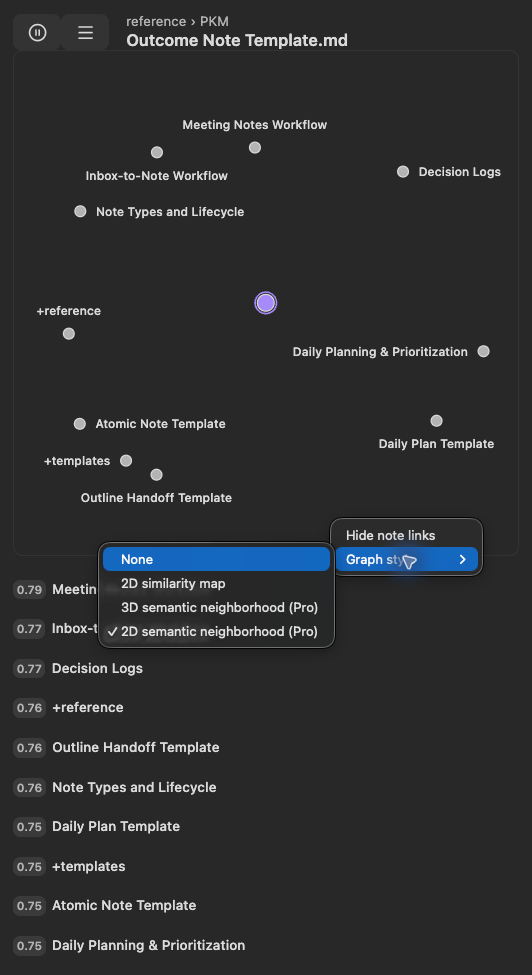
Pro 4.8.3 graph-local menu. The hover over None is not a selection: 2D semantic neighborhood (Pro) remains checked and visible.
Do graph lines create links in my notes?
No. Note-link arrows represent links already authored in notes; semantic guides do not create any. Add a normal Obsidian link when you deliberately want to retain a reviewed source.
Preview a node
On desktop, hold Cmd/Ctrl while hovering a node to use Obsidian Hover Preview for the corresponding note or block.
Select a node
Selecting a node scrolls the matching Connections row into view and expands it for review.
Semantic groups
Group placement is recalculated from the current result set. A node can move when the reference note, result set, model, or indexing state changes. The groups are not a durable taxonomy.
2D and 3D semantic neighborhoods (Pro)
These are additional Graph style options, distinct from the original 2D similarity map. Both place the current note at the center of a local candidate view and connect native candidate inspection to the readable result list.
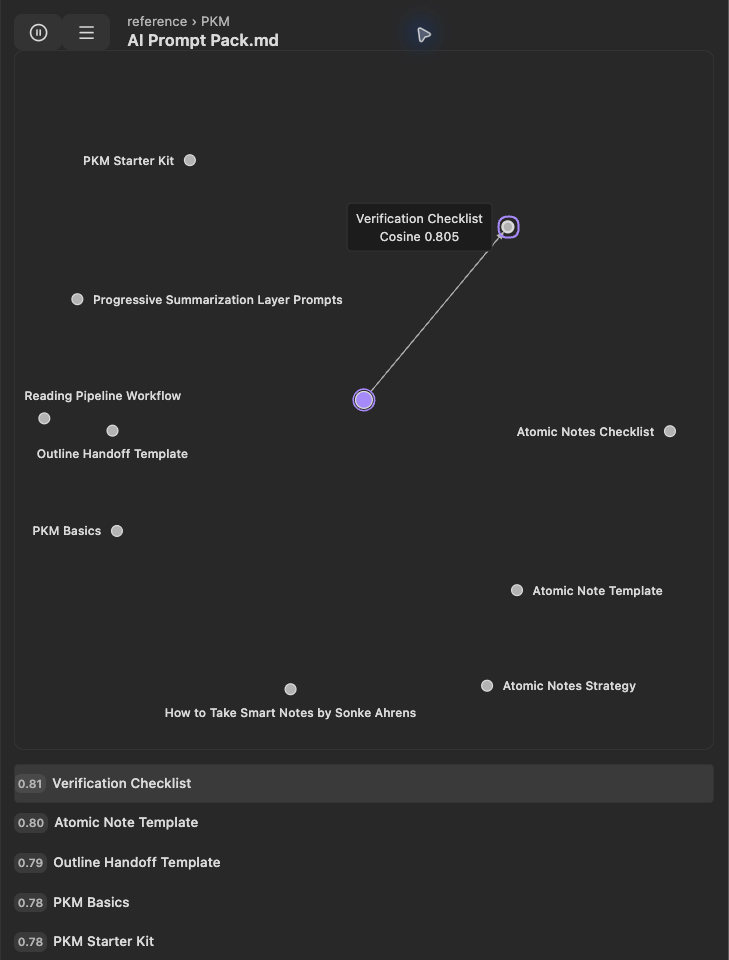
2D neighborhood: named candidates surround AI Prompt Pack. Keyboard focus identifies Verification Checklist and its corresponding row without expanding or opening the source.
In 3D, continue from candidate identity to the actual source passage:
- Identify Beta Reader Feedback and its matching collapsed row beneath Landing Page Messaging.
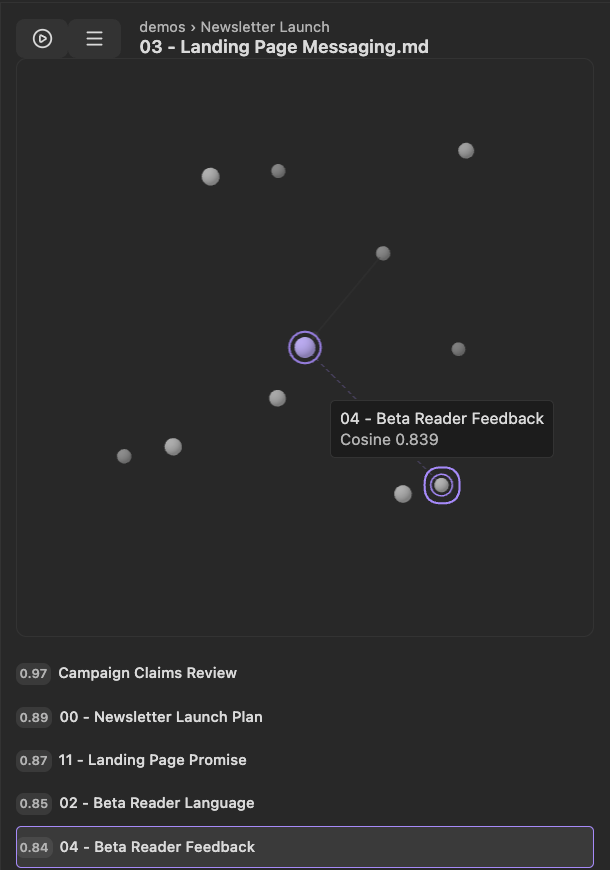
- Click that named, non-center node. Its matching row expands to expose the feedback about practical examples and a working-consultant voice.
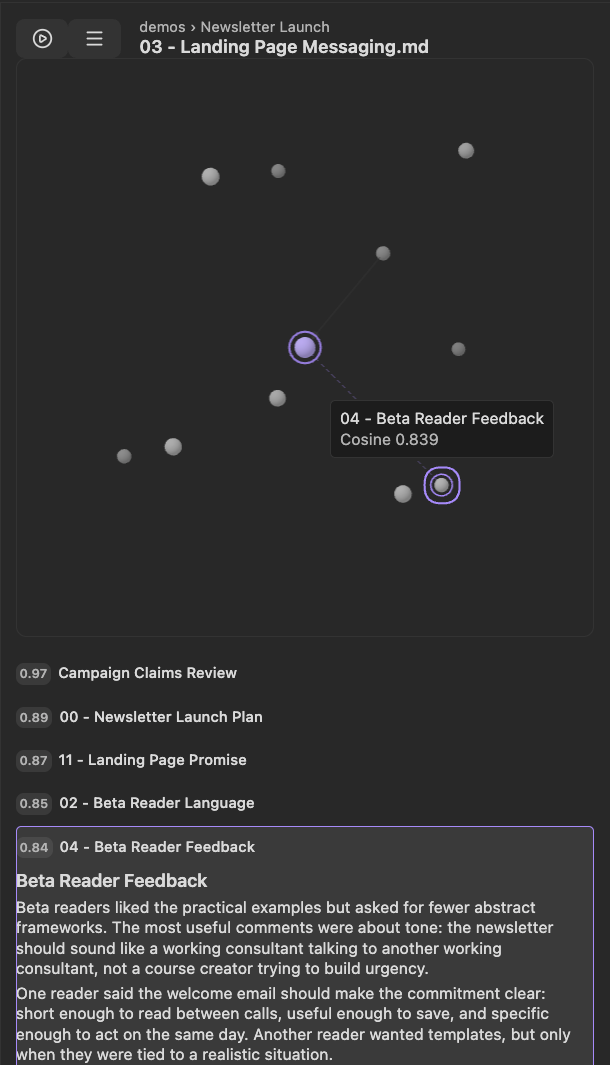
Pro 4.8.3, one matched run. The second view follows a small native upward scroll to keep the target header and passage readable after activation. No source note was opened or edited. These stills show inspection, not camera movement.
- Hover or Tab focus identifies a candidate and its matching row. Focus alone does not open the note or expand the result.
- Click a candidate, or activate the focused node with Enter or Space, to bring its matching row into view and expand it.
- The native cosine label can differ from a configured or rounded list score. Read the source before deciding whether it is useful.
- Dotted name leaders and dashed inspection guides are not authored links. Existing note-link arrows are controlled separately.
- Pixel spacing and apparent node size are not exact similarity measurements: the 2D layout uses a non-linear radial presentation, and the 3D projection changes how distance and depth appear.
Orbit and inspect in 3D
With the 3D canvas focused, Space starts or pauses automatic orbit. Tab to a candidate to stop rotation and inspect its identity against the result list. Space on a focused node activates that node instead, so keyboard focus matters.
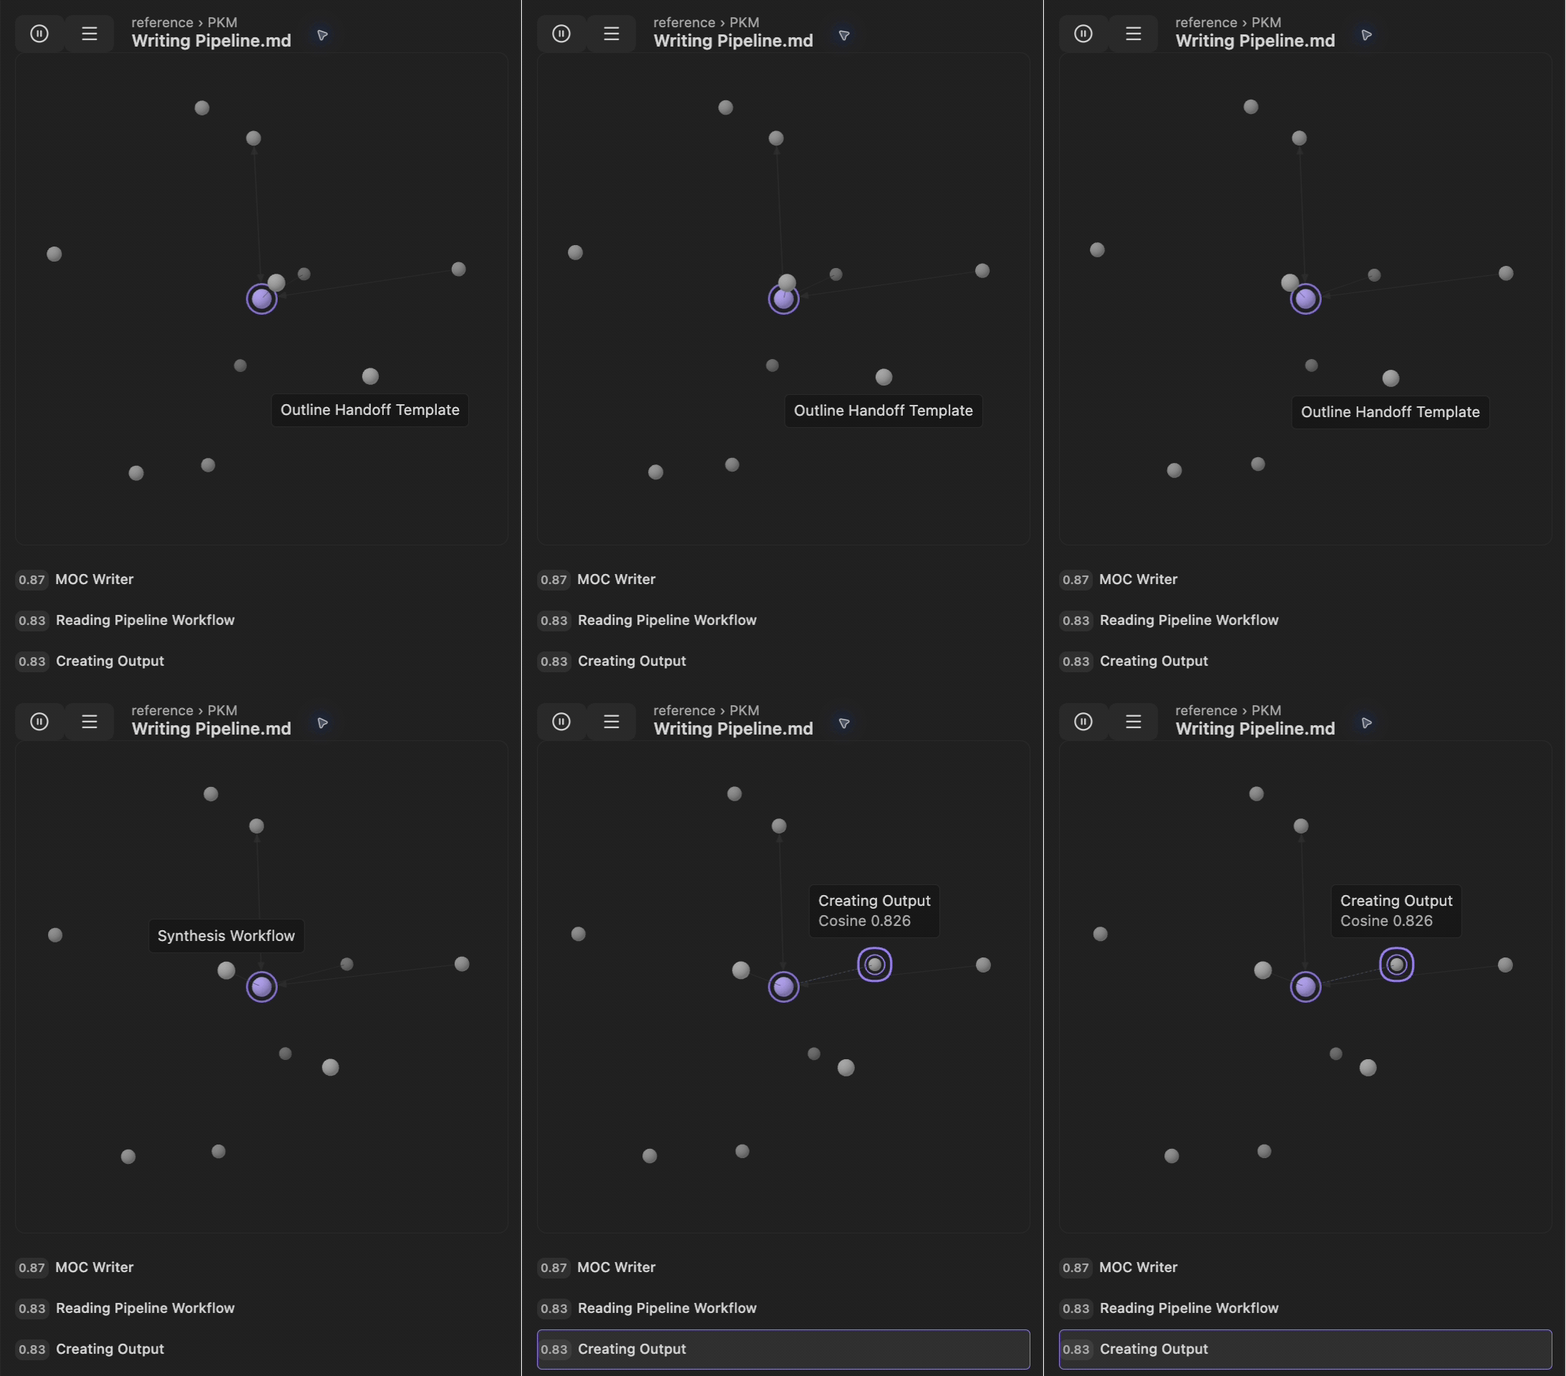
This 9.4-second continuous Pro 4.8.2 recording shows automatic orbit followed by Creating Output inspection. It does not show a manual drag or source opening. Creating Output already links back to Writing Pipeline; this example is not proof of an entirely unlinked discovery.
If the 3D renderer is unavailable, use the result list or choose a 2D style. A rendering failure does not automatically switch styles.
Troubleshooting weak or noisy Connections
- Open a meaningful note.
- Make sure that source import and embeddings are current.
- Leave auto-refresh running.
- After major edits, use Refresh connections.
- Examine the exclusions.
- Tune Sources, Blocks, filters, Hide, Pin, or Pro algorithms only after the basic view returns a useful result.
Find related notes beside the text you are writing
Edition: Pro.
Inline connections use the current paragraph, heading, or block as the semantic anchor and open a focused result popover in the editor.
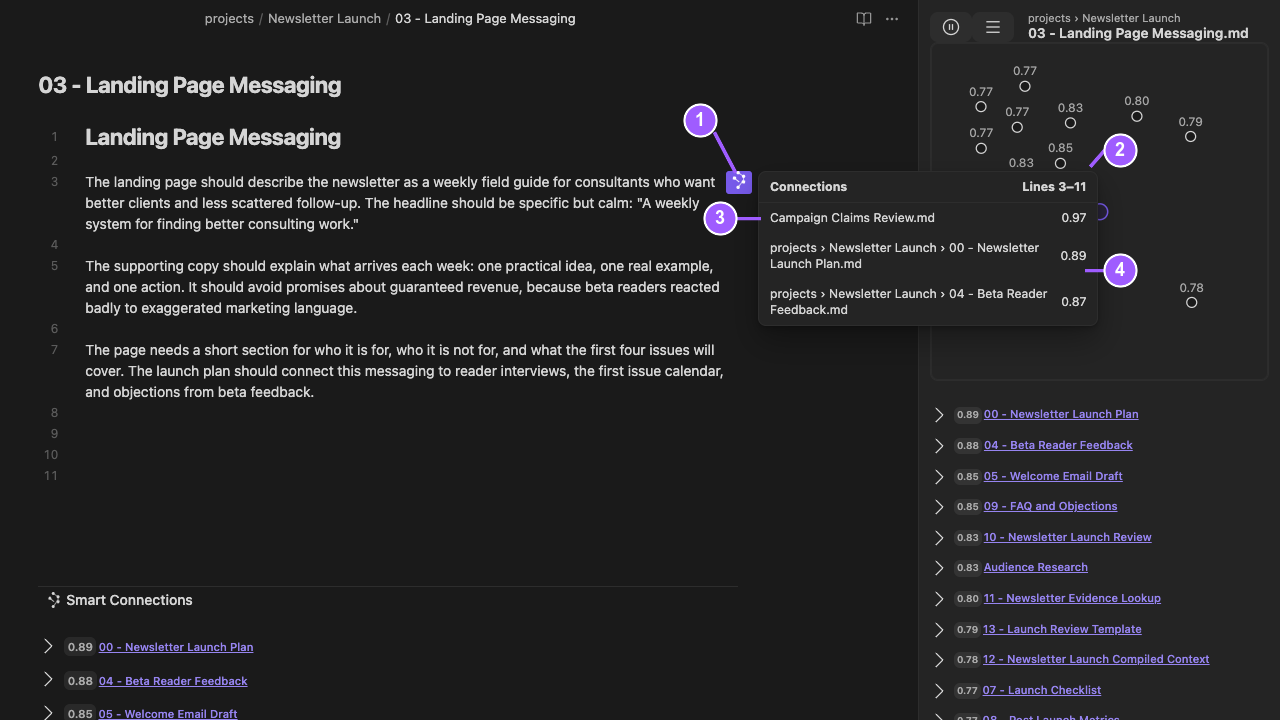
What the numbers identify:
- The purple marker belongs to the nearby editor passage.
- Lines 3-11 names the block range used as the anchor.
- Each row names a candidate source.
- The displayed values are relative connection scores.
Earlier Pro 4.8.1 output example: the marker and popover are discovery controls, not persisted links. The current settings were captured separately; this image does not document the latest popover layout.
Enable or disable Inline connections
Run Smart Connections Pro: Toggle: Inline connections to show or hide inline result markers.
Assign the command to a hotkey when Inline connections are useful only during review passes.
For an on-demand review pass, draft with Inline off, enable it when you are ready to recover related context or add links, review the useful matches, then disable it when you return to focused writing.
Understand the inline indicator
Inline enablement, block eligibility, and the inline threshold determine which blocks receive markers. Use the popover to inspect the actual candidates; a marker alone does not establish that a match is useful.
The marker identifies block-scoped related material. It is not a persisted link.
Why do some paragraphs have no inline marker?
Check whether Inline is enabled, the block is eligible and indexed, and the configured score threshold is suitable. Not every paragraph necessarily produces an indicator.
Does the marker create a permanent link?
No. Drag the useful result into the note when the relationship should become durable.
Open the Inline connections popover
Hover the marker to open the related-result popover for that block.
The popover shows the strongest visible candidates and a path to the full list.
Preview and open a result
Hold Cmd/Ctrl while hovering a result to use Obsidian Hover Preview on desktop. Click a result to open its note.
Open the full result list for a block
Select the popover header that includes the Connections label and line range. The Connections view opens the full result set for that block.
How do I see more than the popover results?
Open the popover header to send that block anchor to the full Connections view.
Tune the inline score threshold
Inline inherits Connections candidate scoping and adds controls for how much signal appears while editing:
| Control | Effect |
|---|---|
| Inline connections score threshold | Sets how strong a match must be before a marker appears. |
| Include filter and Exclude filter | Restrict candidates by file path where available. |
If normal Connections results work but inline markers do not appear, review the inline threshold and block eligibility. If the popover is too broad or noisy, narrow the candidate paths before changing indexing or model settings. Open the popover header when you need the full block-anchored result list.
Code blocks and unsupported content
Inline processing can skip fenced codeblocks so generated markers do not interfere with code, prompts, or structured block content.
The setting applies only to inline markers. Normal Connections results remain available elsewhere.
Inline vs Footer vs the Connections view
Use the surfaces as follows:
- Use Inline when one exact block is the intended target.
- Use Footer for note-end review.
- Use the Connections view for persistent whole-note exploration.
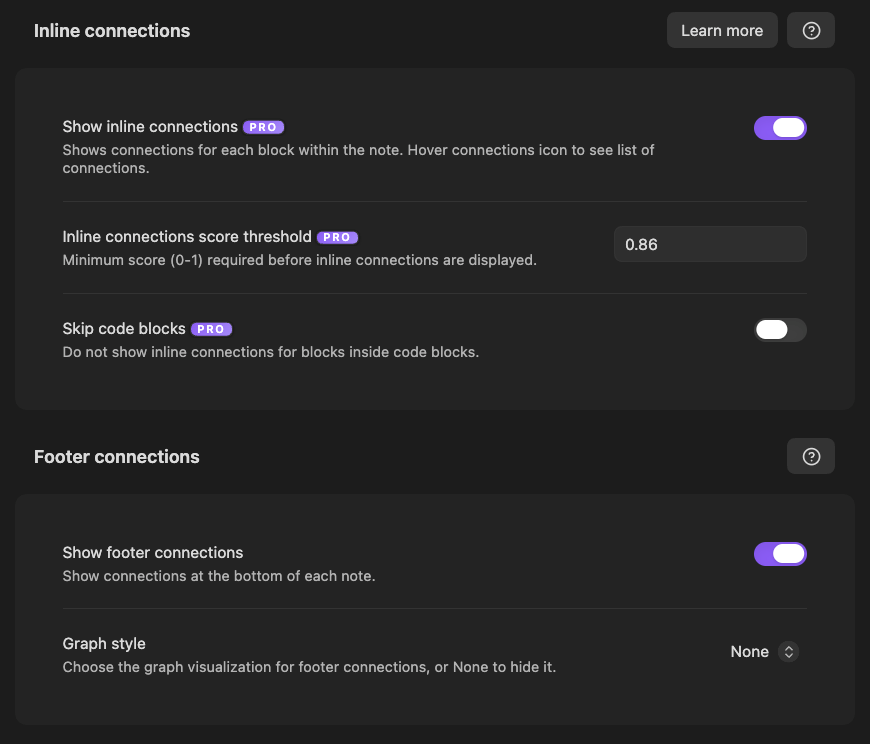
- Show inline connections enables block-level markers; the threshold and Skip code blocks tune their eligibility.
- Show footer connections enables note-end results.
- Footer Graph style chooses None or a component independently of Footer enablement and the sidebar's component choice.
Pro 4.8.3 settings captured September 14, 2026: Inline is on at 0.86, Skip code blocks is off, and Footer is enabled with Graph style None. Footer was temporarily enabled for this capture. These are captured values, not defaults or proof of setting persistence.
Troubleshooting Inline connections
- If normal Connections works but no indicators appear, lower the threshold.
- If the editor is noisy, raise the threshold.
- Make sure that the block is eligible.
- Reopen the Inline connections popover after material edits.
Show related notes at the bottom of an Obsidian note
Edition: Core and Pro.
Footer connections mount the Connections result display at the end of the current note and appear when the note ending is visible.
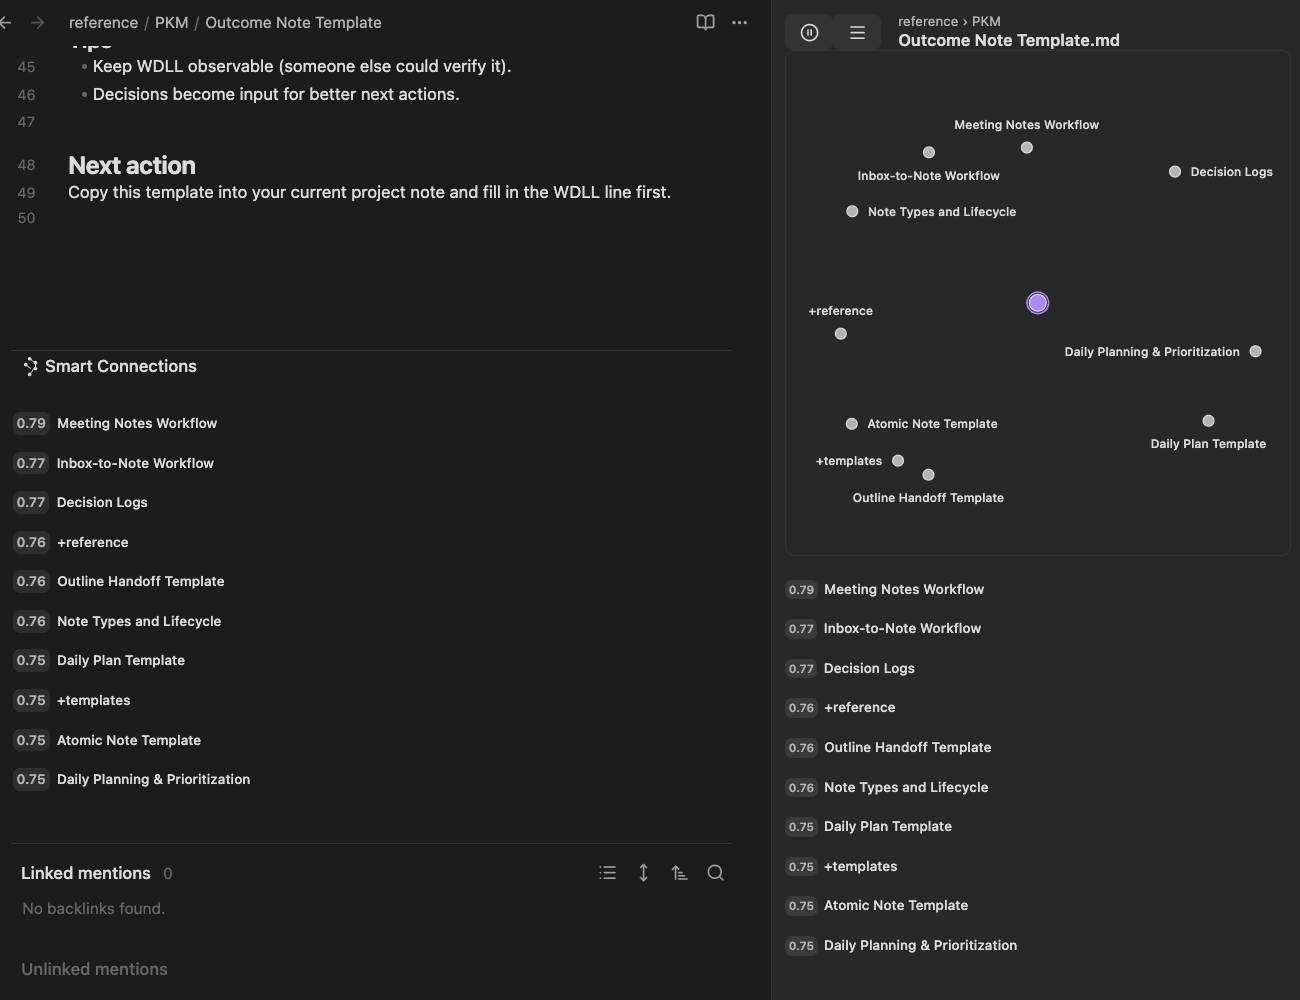
Pro 4.8.3 desktop example: Footer Graph style is None, but its related-note rows remain available. The sidebar graph stays visible. This shows the note-end surface, not an expanded source passage; placement and gestures can vary on mobile.
Enable Footer connections
Run Smart Connections: Toggle: Footer connections, or enable Show footer connections in Connections settings. This toggle controls the whole Footer surface, not just its graph.
Footer uses the same related-result model as the Connections list, mounted at the end of the editor.
Configure the Footer graph
Footer connections use the canonical result list at the bottom of notes, with their own Graph style choice.
- Choose None to keep the note ending compact and put result rows first.
- Choose a graph component to include it above the Footer list when the overview is worth the additional vertical space.
Use the selector under Footer connections in settings. In an expanded Footer, right-click a result, then choose Settings > Graph style. The Footer heading folds the surface; it is not the menu entry point. Show footer connections remains a settings toggle, not an action in this menu.
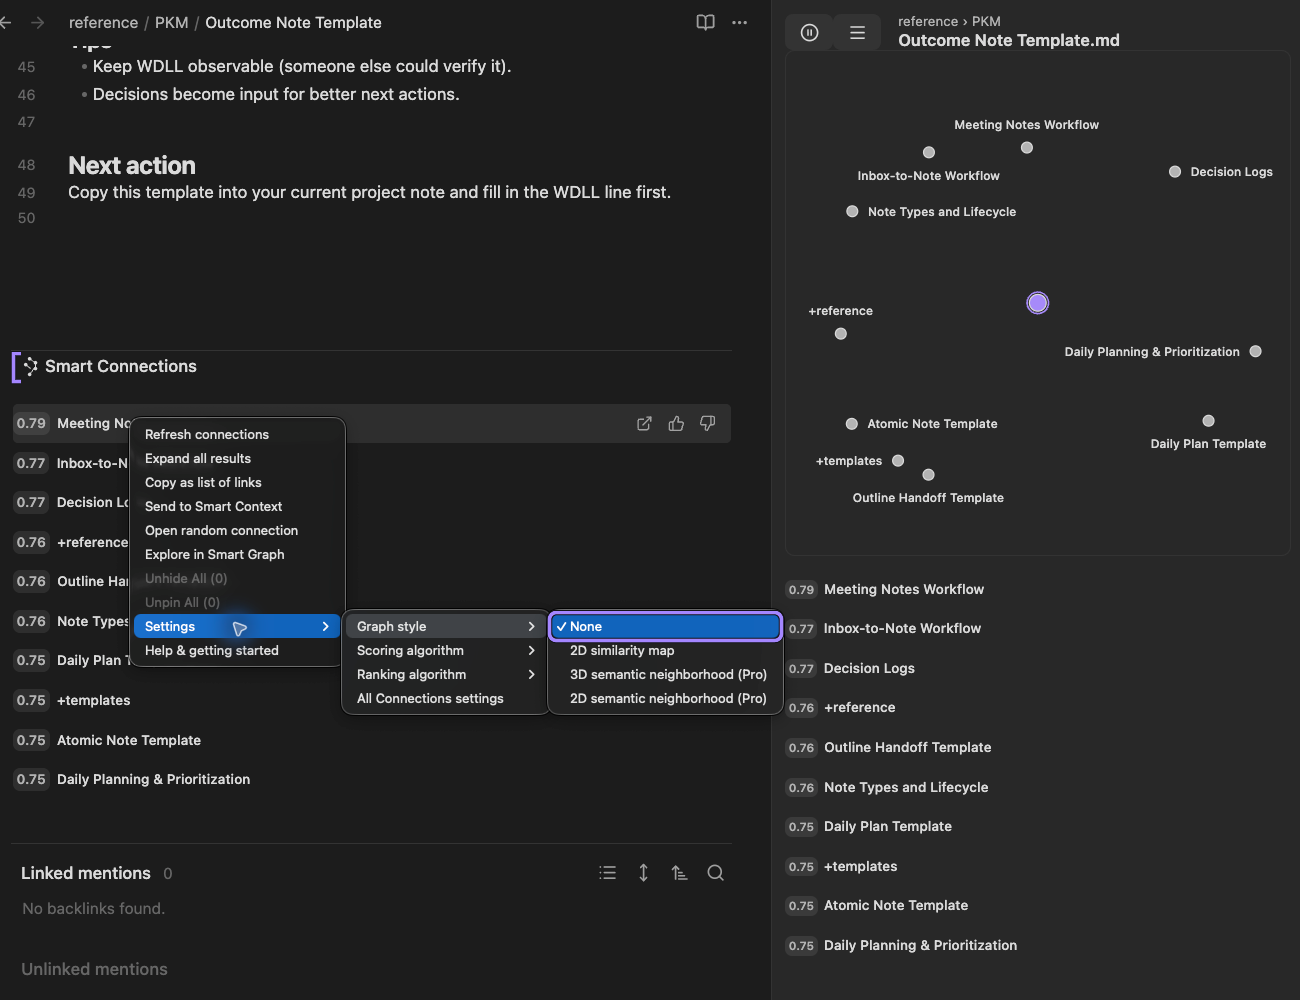
The complete native Footer result-menu route in Pro 4.8.3. None is checked; a source passage has not been expanded or opened.
The sidebar and Footer can use different graph components. Their configuration is separate from Footer enablement:
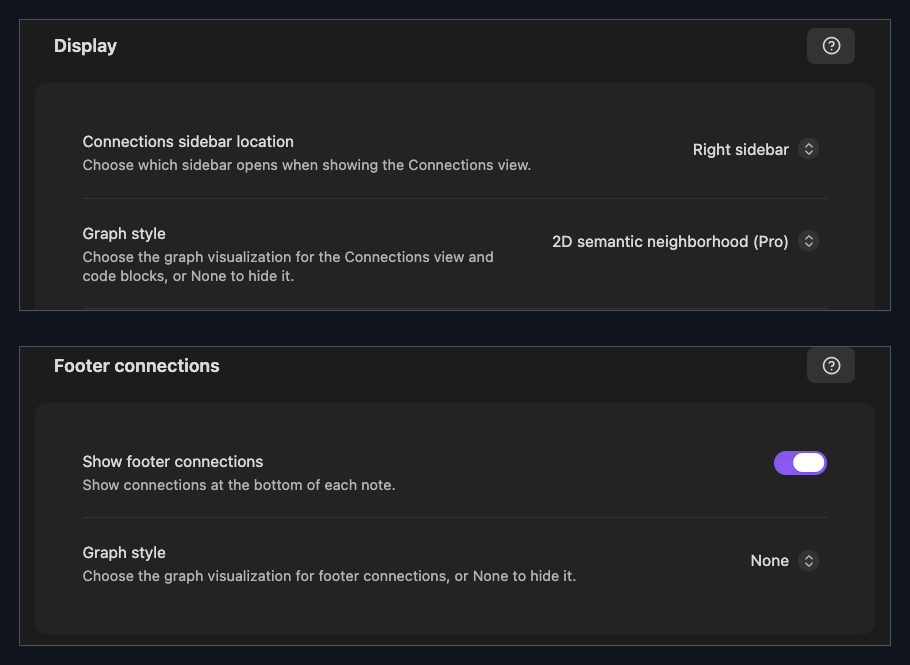
Two settings captures, not one native frame: Footer was enabled between them, while sidebar 2D semantic neighborhood (Pro) and Footer None stayed unchanged. This shows separate configuration, not reload persistence.
Why is there no graph in the footer?
The Footer has no graph when its Graph style is None. Enable Footer connections, then choose a component if you want a graph. Choosing None hides only the graph; disabling Show footer connections hides the whole Footer.
When the footer appears
The footer renders only when the end of the note is visible.
This keeps Footer connections at the end of the note instead of occupying space throughout the document.
Why is the footer not visible?
Confirm Footer connections are enabled and scroll until the last line of the note is visible.
Expand or collapse the footer
Use the footer header to collapse or expand the results.
The footer remembers its folded state.
Does collapsing the footer disable Connections?
No. It changes only the footer presentation. Re-expand it to see the same note-level results.
Read and expand Footer connections results
Expand a result to inspect more context before opening the source.
Expansion does not create a link or change the current note.
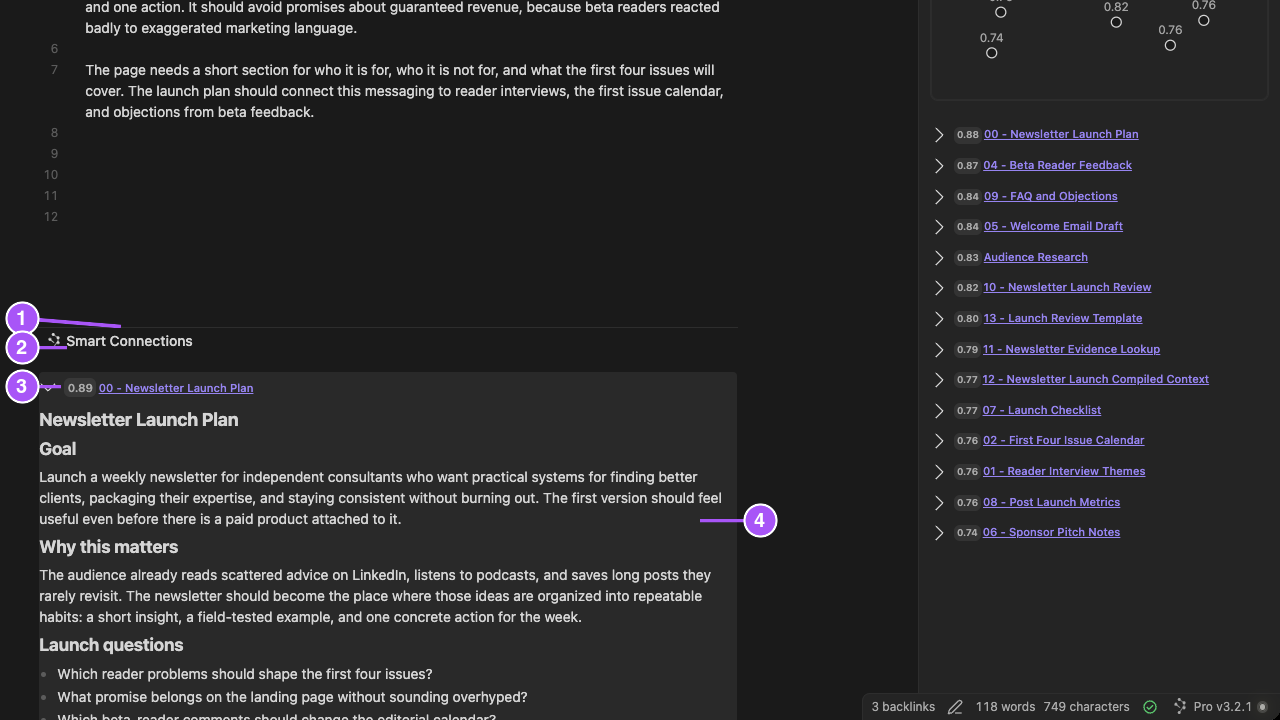
The numbers identify the note ending, the Footer heading, the expanded source identity and score, and its passage. This earlier Pro 4.8.1 example illustrates source expansion, not the current component menu.
Drag to create a link
On desktop, drag a result from the footer into the editor to insert an Obsidian link.
Open a result
Open a result when the inline preview is not sufficient.
Use Footer connections on mobile or without a sidebar
Footer connections provide a note-end surface when a sidebar is impractical. On mobile, use the controls available in your installation.
Where Graph style is available, choose None to keep the Footer compact or a component when a graph is worth the extra space. The current control screenshots are desktop evidence, not a new mobile capture.
If Smart Environment loading is deferred:
- Select Load Smart Environment.
- Wait for Smart Environment ready or Ready.
- Then diagnose the Footer.
When should I use the sidebar instead?
Use the sidebar for continuous exploration, Pause auto-refresh, copying links, and sending a result set to Smart Context.
Footer vs Inline vs the Connections view
Use the surfaces as follows:
- Use Footer for note-end review.
- Use Inline connections when one block is the intended target.
- Use the Smart Connections view for persistent whole-note exploration.
Troubleshooting Footer connections
- Make sure that the setting is enabled.
- Scroll to the end of the note.
- Expand the Footer.
- Make sure that the current note produces normal Connections results.
If the Footer is too large, choose Graph style > None. Choose a component when you want a graph above Footer results; leave Show footer connections enabled to keep the result list.
Tune Smart Connections scoring and ranking
Edition: Pro.
These Connections Pro controls shape results in three layers: candidate scope, primary scoring, and final ranking.
Set the candidate type before scoring
Select Sources for note-level candidates or Blocks for heading/block-level candidates.
Candidate selection happens before scoring. Fix an overly broad pool before tuning the score.
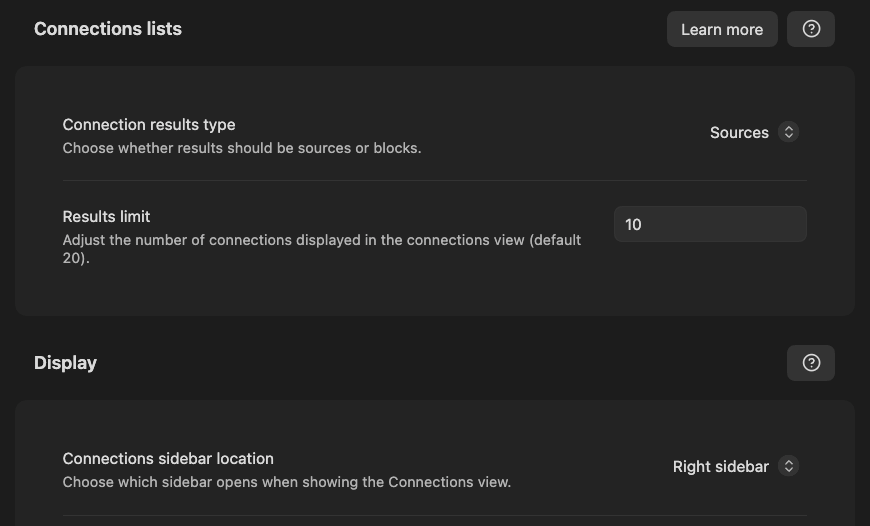
The visible controls:
- Connection results type chooses Sources or Blocks.
- Results limit bounds the visible candidate count.
- Connections sidebar location controls where the persistent view opens.
Candidate type and limit shape the pool before scoring or ranking.
Configure result presentation
Edition: Pro.
- Result style selects how result rows are displayed, with Latest as the Pro default for new or unset configurations. An existing explicit choice is preserved rather than universally replaced on upgrade.
- Show full path includes the folder path in displayed results.
- Show formatted text shows links, headings, bold text, and other formatting in connection results. Turn it off to show plain text.
These controls change presentation. They do not change candidate eligibility, scoring, or ranking.
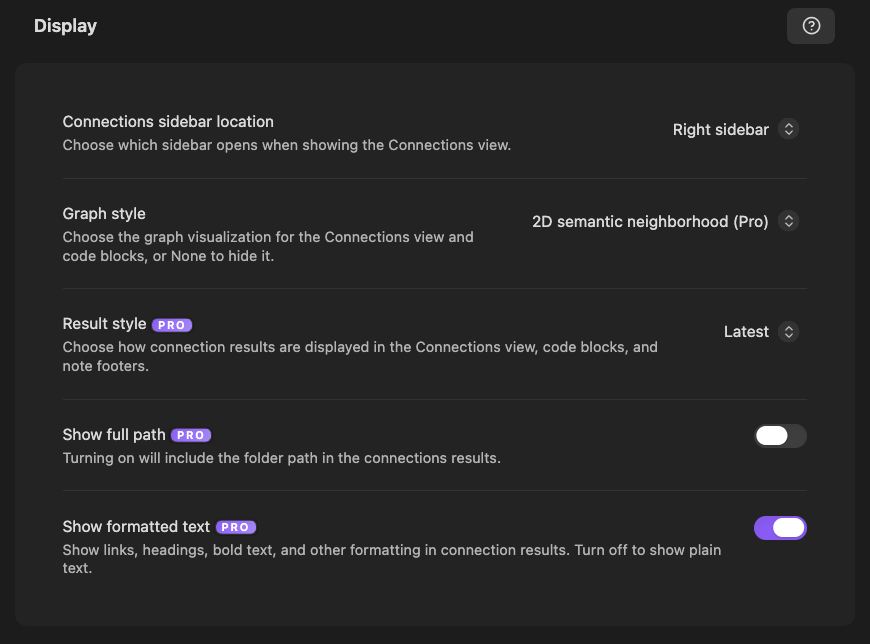
Configure candidate filters
Filters decide which candidates are eligible.
Use include and exclude rules to set structural boundaries. Examples include project paths, archives, templates, and tags. Apply these rules before you add a more complex scoring algorithm.
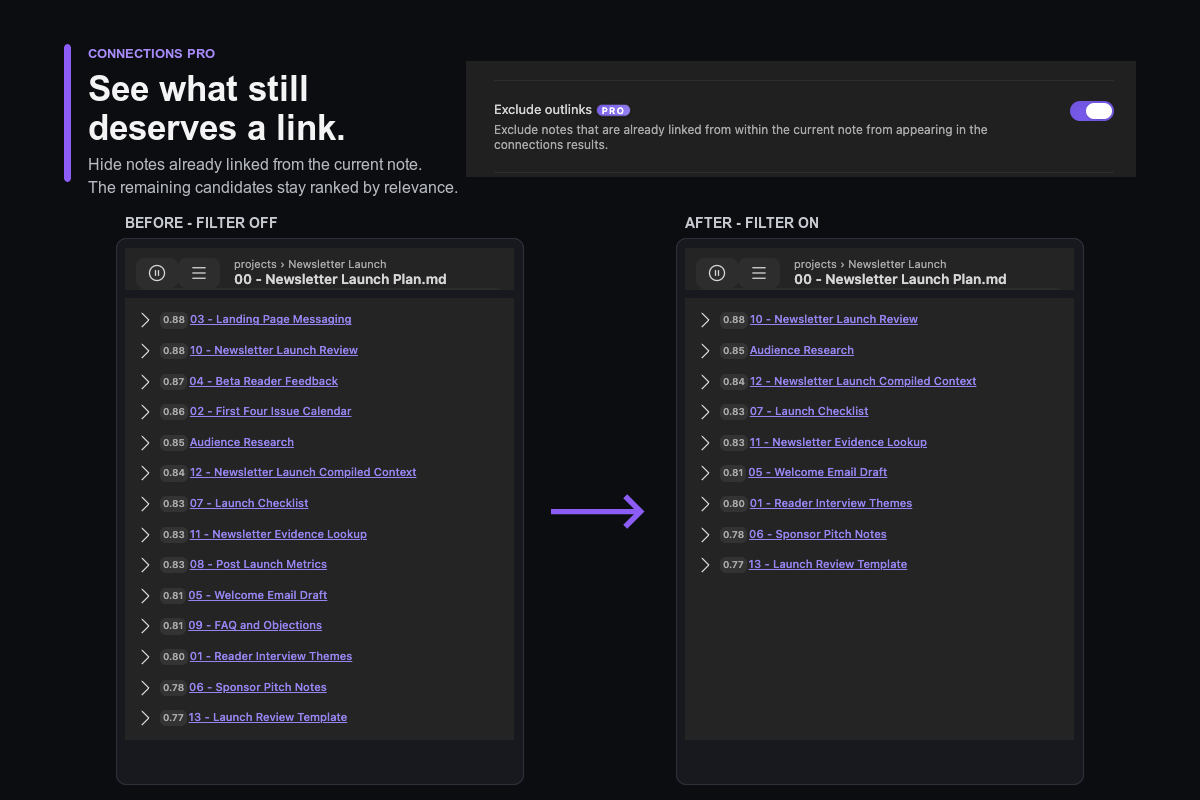
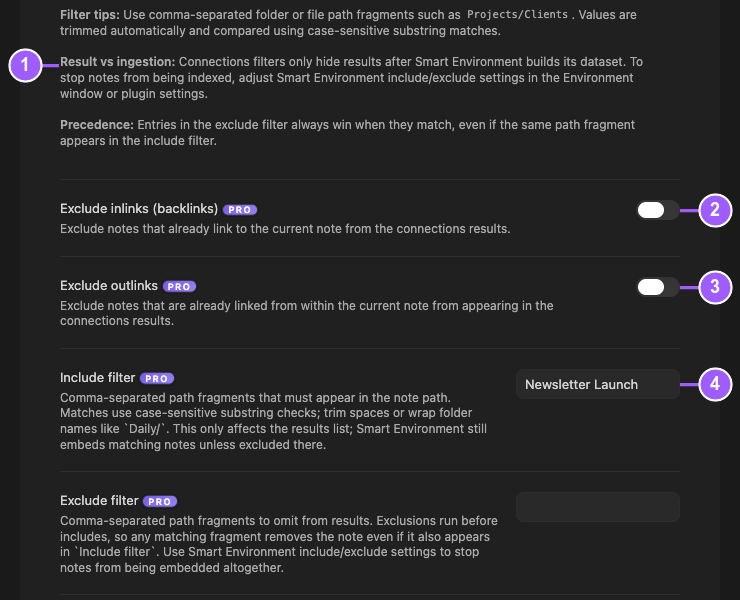
What the numbers identify:
- The filter notes distinguish display filtering from Smart Environment ingestion.
- Exclude inlinks (backlinks) removes notes that already link to the target from displayed results.
- Exclude outlinks removes notes already linked from the target from displayed results.
- Include filter restricts displayed results to paths containing Newsletter Launch.
Additional Pro controls in the same settings group:
- Exclude filter removes results whose path contains any listed fragment. It runs before Include filter.
- Frontmatter include filter accepts newline-delimited matchers such as
statusorstatus:open. Frontmatter keys and values are matched case-insensitively. - Frontmatter exclude filter removes matching results. Exclude entries take precedence over frontmatter include entries.
- Hide frontmatter blocks in results omits frontmatter-derived Blocks from displayed results so the list shows Sources instead of frontmatter blocks.
Connections filters change the visible candidate set after Smart Environment builds the dataset. They do not delete notes or change which sources Smart Environment indexes. To stop indexing content, change the applicable Smart Environment include or exclude settings.
Choose a score algorithm
Score algorithms compute the primary relevance value.
Open Settings > Scoring algorithm in the Connections menu, or use the Scoring algorithm selector on the settings page. The earlier Pro 4.8.1 settings example below illustrates the control's role, not the current menu route.
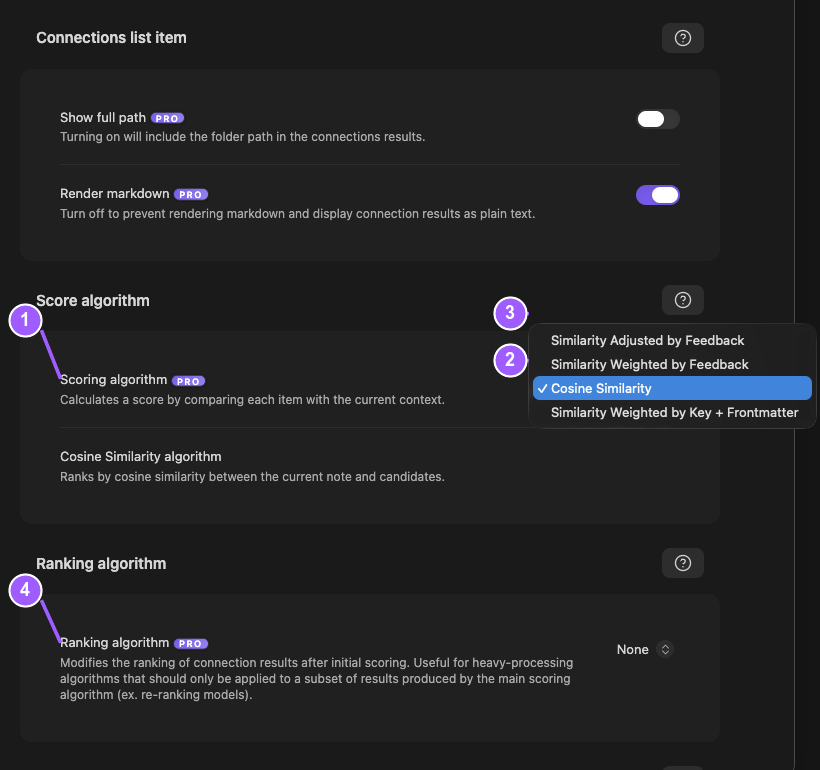
What the numbers identify:
- The scoring selector controls the primary relevance calculation.
- Cosine Similarity is selected.
- The menu lists the current feedback and key/frontmatter alternatives.
- Ranking remains a separate step below scoring.
Choose one algorithm. Refresh the same target. Compare the results. Keep the change only when the results improve consistently.
| Algorithm | Use |
|---|---|
| Cosine Similarity | Stable baseline without feedback. |
| Similarity Adjusted by Feedback | Penalize candidates similar to hidden results. |
| Similarity Weighted by Feedback | Boost pinned-like signals and dampen hidden-like signals. |
| Similarity Weighted by Key + Frontmatter | Apply path, key, heading, or metadata multipliers. |
Choose a ranking algorithm
Ranking algorithms reorder already-scored candidates. Open Settings > Ranking algorithm in the Connections menu, or use the Ranking algorithm selector on the settings page. The example below is from Pro 4.8.1.
Ranking None preserves scored order. It is different from Graph style None, which hides a graph without removing result rows.
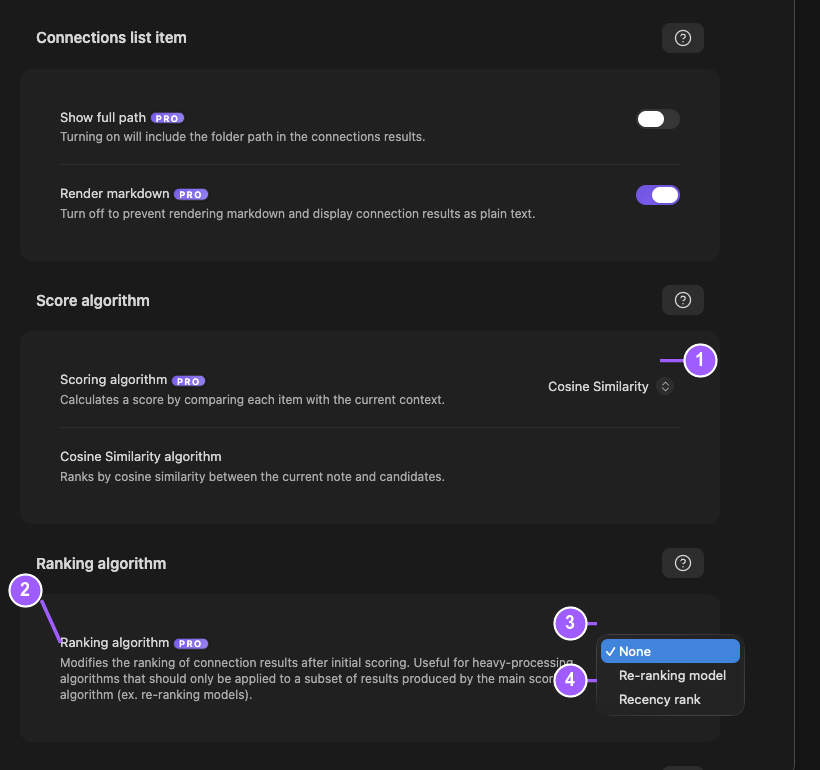
What the numbers identify:
- Scoring remains Cosine Similarity.
- The separate Ranking algorithm control changes final order.
- None preserves score order.
- Re-ranking model and Recency rank are the other visible choices.
Select a ranking method. Refresh the same target. Compare the results. Keep the change only when the results improve.
| Algorithm | Use |
|---|---|
| None | Preserve score order. |
| Re-ranking model | Apply a configured Smart Rank model to top candidates. |
| Recency rank | Make modification time dominate final order. |
Start from a known preset
| Goal | Candidate type | Score | Ranking |
|---|---|---|---|
| Stable note-level baseline | Sources | Cosine Similarity | None |
| Reduce recurring noise after deliberate hides | Sources | Similarity Adjusted by Feedback | None |
| Use stable pinned and hidden preferences | Sources | Similarity Weighted by Feedback | None; add a reranking model only if useful candidates remain out of order. |
| Emphasize paths, headings, or metadata | Blocks | Similarity Weighted by Key + Frontmatter | None; use Recency rank only when freshness should dominate. |
Keep the target, filters, and result limit stable while testing one preset.
What is the difference between scoring and ranking?
Scoring decides the primary relevance value. Ranking changes the final order after scoring.
Use feedback-aware scoring
Feedback-aware algorithms use pinned and hidden signals.
Use them only when those actions represent stable preference. A one-off hide can otherwise create an unintended recurring bias.
Weight paths, keys, headings, and frontmatter
Weight configuration multiplies the base score when key fragments or metadata match.
{
  "key_weights": {
    "Projects/": 1.2,
    "Readwise/": 0.8
  },
  "meta_weights": {
    "status:evergreen": 1.15,
    "type=spec": 1.1
  }
}
key_weightsapplies substring matches to source keys, paths, or headings.meta_weightsacceptskeyto match the presence of a frontmatter key, andkey:valueorkey=valueto match a key/value pair.- Multiple matching weights multiply together.
Use weights for structural intent. Use Recency rank for freshness intent.
Configure a reranking model
Re-ranking requires a configured Smart Rank model in Smart Environment Pro. Configure the default ranking model in Smart Environment Pro settings before relying on this mode.
When Re-ranking model is selected, Show original connection score can display the original score alongside the re-ranked score. This changes visible score detail, not model availability or result order.
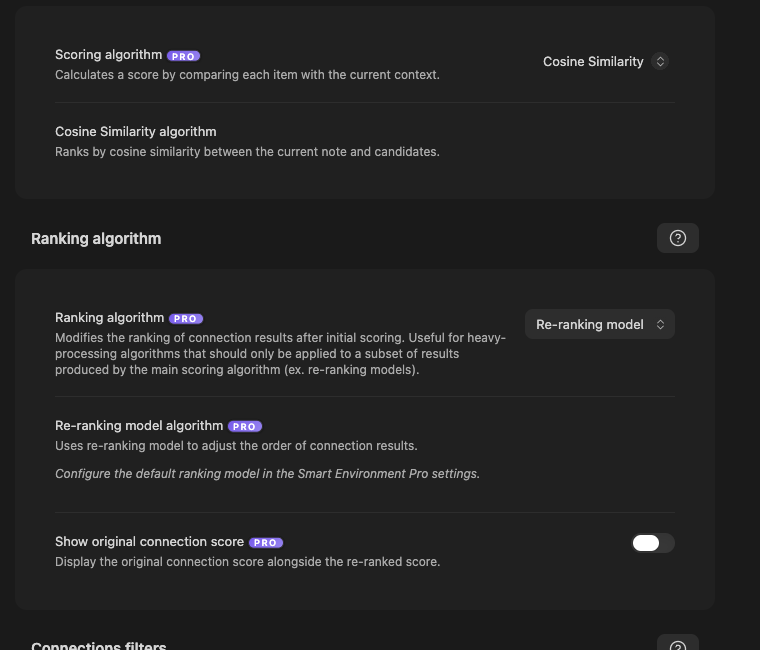
If no compatible ranking model is available, use None or Recency rank.
Rank by recency
Recency rank reorders the scored candidates by modification time.
Use it when freshness should dominate. Do not use it to solve an eligibility or semantic-scope problem.
Troubleshoot broad, weak, or noisy results
| Symptom | First adjustment |
|---|---|
| Results are too broad | Lower result limits, add include filters, exclude archives, templates, or exports, or switch to Blocks when long notes hide useful sections. |
| Blocks are too noisy or expensive | Return to Sources or tune block preparation in Smart Environment. |
| The same low-value notes keep returning | Hide them, test Similarity Adjusted by Feedback, or add path or frontmatter excludes. |
| Valuable tagged or foldered notes are under-ranked | Add key or frontmatter weights and verify metadata spelling while keeping other settings stable. |
| Useful candidates are present but ordered poorly | Add one ranking algorithm and compare against the baseline. |
| No useful results appear anywhere | Stop tuning algorithms and verify note eligibility, source preparation, and vault coverage in Getting started with Smart Connections. |
Change one layer at a time: scope, then filters and limits, then scoring, then ranking.
Why did changing three settings at once make results harder to evaluate?
Scope, score, and ranking changed simultaneously. Return to a baseline and alter one layer at a time.
Should I use Dedupe when similar notes keep appearing?
Use Dedupe when repeated material needs a keep, merge, archive, or ignore decision. Use algorithm tuning when the issue is result ordering.
Tune in the correct order
- Choose Sources or Blocks.
- Narrow the candidate pool.
- Establish Cosine Similarity as the baseline.
- Change scoring only when relevance is consistently wrong.
- Add ranking only when the correct candidates are in the wrong order.
Compare algorithm changes
Keep the target, candidate pool, and filters stable. Test one change. Compare useful results across several representative notes. Do not compare score ranges alone.
Do not judge an algorithm from its settings alone. Compare result sets while keeping the target, scope, filters, and candidate pool fixed.
Rank Obsidian Bases rows by semantic relevance
Edition: Pro.
Connections in Bases compares each represented note with a reference note and exposes the result as formula values that can be sorted or filtered.
Requirements
To check source preparation, you can first confirm that Smart Connections returns useful results. The active file must be a .base file and Connections Pro must expose the score and link-list functions. Both functions appear in Bases formula autocomplete when the integration is active.
Add a Connections score column
- Open a
.basefile. - Run
Smart Connections Pro: Add: Connections score bases column.
The command opens a reference-note selector and inserts a formula column that scores each row relative to the selected note.
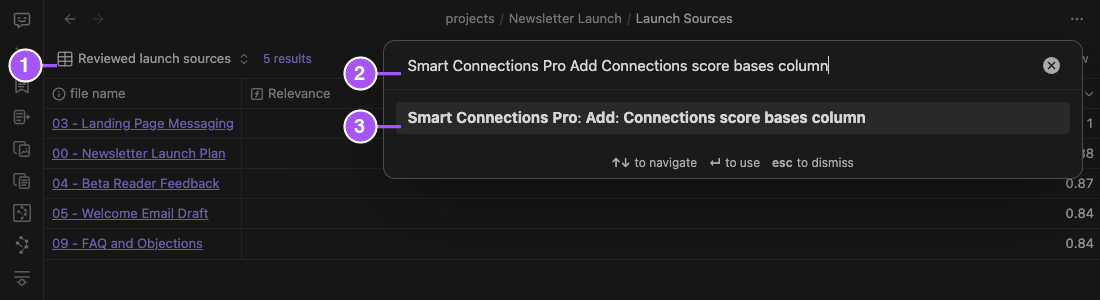
What the numbers identify:
- A
.basefile with five reviewed source rows is active. - The full Add: Connections score bases column command is entered.
- The matching command is ready to run.
Run the command while the intended Base is active. Make sure that the new score column appears. Then configure its reference.
- Make sure that Connections Pro is active.
- Make sure that the Base contains a supported note-file column.
- Reopen the Base.
- Search the Command Palette again.
Why does the score-column command not appear?
The active file must be a .base file and the Pro Bases integration must be available.
Choose a fixed reference note
Choose one reference:
- Choose a fixed note for a stable comparison.
- Choose Current/active file (dynamic) for a Base that follows the active note.
Dynamic references work best when the Base is kept in the sidebar.
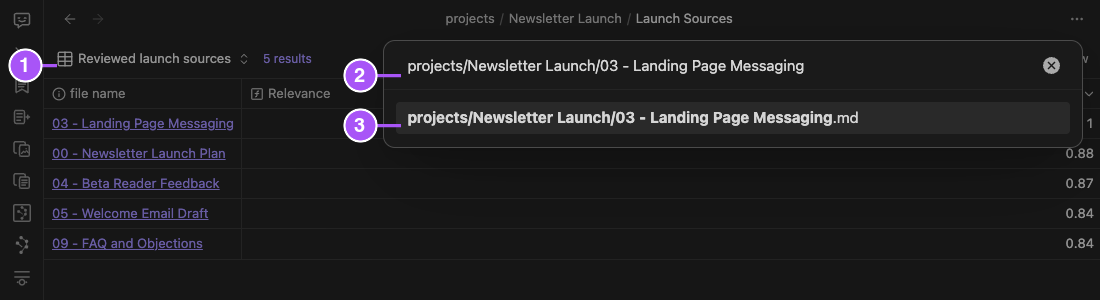
What the numbers identify:
- The same five-row Base remains visible behind the selector.
- The requested reference path is visible in the selector.
- Landing Page Messaging.md is the fixed note ready to choose.
Why do scores differ from another Base?
Candidate filters, reference note, embedding model, and scoring algorithm can differ. Compare scores only inside the same configured view.
Use the current active note as a dynamic reference
The dynamic option uses the current active file as the comparison target.
Keep the Base visible in a sidebar when it should behave like a filtered, sortable Connections dashboard.
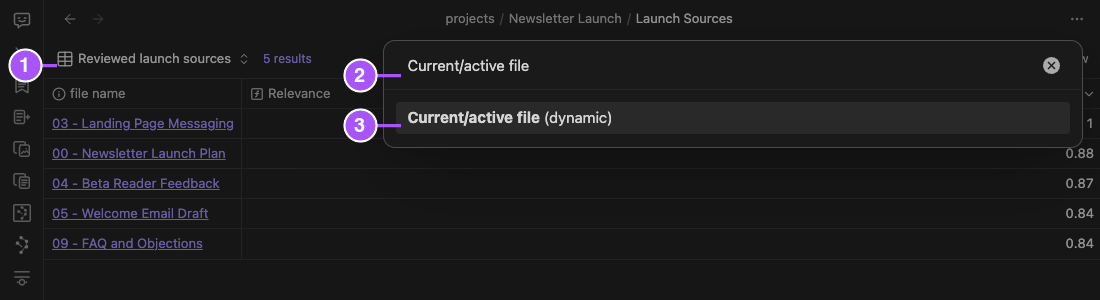
What the numbers identify:
- The
.basefile remains the destination for the generated column. - The selector is filtered to the active-file option.
- Current/active file (dynamic) is ready to choose.
Choose a dynamic reference. Change the active note. Make sure that the scores update as expected.
Use score_connection
score_connection returns a numeric connection score using the configured Connections scoring algorithm.
score_connection(file, file2)
file.score_connection(file2)
Use list_connections
list_connections returns a list of related links prefixed with their connection scores for a row.
list_connections(file)
file.list_connections()
Use it beside a score column when the Base should show both ranking and an actionable link trail.
Should I use score_connection or list_connections?
Use the score for sorting and filtering. Use the link list when you also want immediate navigation to related notes.
Bases formula examples
Fixed-reference examples:
file.score_connection("+Projects/Project Alpha.md")
score_connection(file, "+Projects/Project Alpha.md")
Related-link examples:
file.list_connections()
list_connections(file)
Compare multiple anchors and prepare a shortlist
Add one score column per reference note when a collection must be evaluated across multiple lenses, such as Goal A, Goal B, Draft, or Constraints. Sort by one column, scan the others, then filter to rows that perform well across the lenses that matter. Review outliers before deciding.
For a grounded AI handoff, review a small shortlist, send only the selected notes to Smart Context, and remove noise before copying or sending the package.
Sort and filter by relevance
Filter the Base first to define the candidate set, then sort the score column descending.
A score is most useful as a relative ranking inside one Base and one reference point.
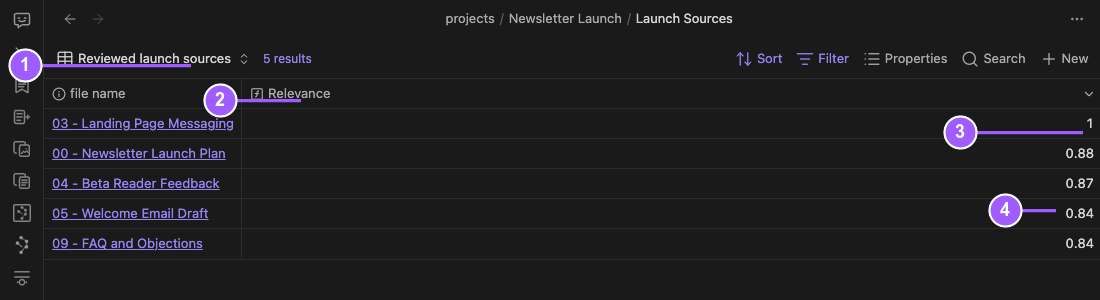
What the numbers identify:
- The Base still contains the same five reviewed rows.
- The Relevance formula column contains Connections values.
- The fixed reference note scores
1against itself. - The remaining values are ordered from highest to lowest.
Compare values only inside this Base and reference configuration.
Use a dynamic Base in the sidebar
A Base using the active-file reference can stay docked while you move through notes.
The table then reranks only the rows allowed by the Base filters.
Interpret Connections scores in Bases
Treat the score as a relative signal inside the same Base and reference point. Model, candidate scope, filters, and algorithm choice can change the range. When the configured scoring algorithm uses feedback, pinned or hidden signals can affect values the next time the Base recalculates.
Troubleshooting Connections in Bases
- Make sure that a
.basefile is active. - Check source preparation.
- Check the reference note.
- Dock dynamic Bases in the sidebar.
- Filter broad collections.
- Check the configured score algorithm.