Exploring the Connections view
The Connections list is the core Smart Connections experience: a ranked list of notes (or blocks) related to what you are looking at right now.
If your vault has ever felt like:
"I know I wrote something about this, but where is it?"
Connections is the answer.
It resurfaces the most relevant context automatically so you can keep writing instead of organizing.
- zero-setup local embeddings keep the workflow private and fast
- keep your writing momentum by staying in the same note
- build link trails that make future retrieval easier
- turn a single note into a ranked reading plan
- bridge directly into Smart Context when you want grounded AI help
- Open any note and scan the top results.
- Preview 1-2 results to confirm relevance (Cmd/Ctrl hover).
- Act immediately:
- drag results into your note to create links, or
- copy a ranked link list, or
- send results to Smart Context.
- Use Pause to hold one anchor steady while you browse.
- Hide noise and pin essentials.
What this solves (the real PKM problems)
Connections is for:
- Rediscovering forgotten work at the moment it becomes useful
- Linking related notes without browsing folders or hunting search results
- Preventing duplicate work (rewriting, re-researching)
- Keeping your system lightweight (less manual tagging and maintenance)
Why it works without perfect organization
Connections adds value before your vault is perfectly tidy:
- it uses local embeddings to rank what is semantically related, not just what shares the same words
- it helps you find useful notes even when your folders, tags, and links are incomplete
- it turns relevance into structure by making it easy to preview, link, copy, and reuse what you find
- it lets you stay in a lightweight vault instead of maintaining an elaborate taxonomy before you can benefit
If you want "search by meaning" (query-first), use Smart Lookup:
https://smartconnections.app/smart-connections/lookup/
If you want "what is related to the note I am in right now?" (note-first), you are in the right place.
Quick start (60 seconds)
- Open the Connections view.
- Open any note and scan the top results.
- Preview 1-2 results (Cmd/Ctrl hover).
- Drag 1-3 results into your note to create links.
- Pause when you want stable context while you switch notes.
- Optional: Send results to Smart Context to build an AI-ready bundle.
Connections vs Lookup (fast decision)
| Need | Use | Why it fits |
|---|---|---|
| Current note -> related ideas | Connections list | Anchored to what you are viewing now |
| A question -> best answers | Smart Lookup | Query-first discovery |
| Exact phrase, regex, filename, tags | Obsidian search | You need lexical matching |
Core moves (the 5 actions you will use daily)
1) Drag to create links (fastest path to a better vault)
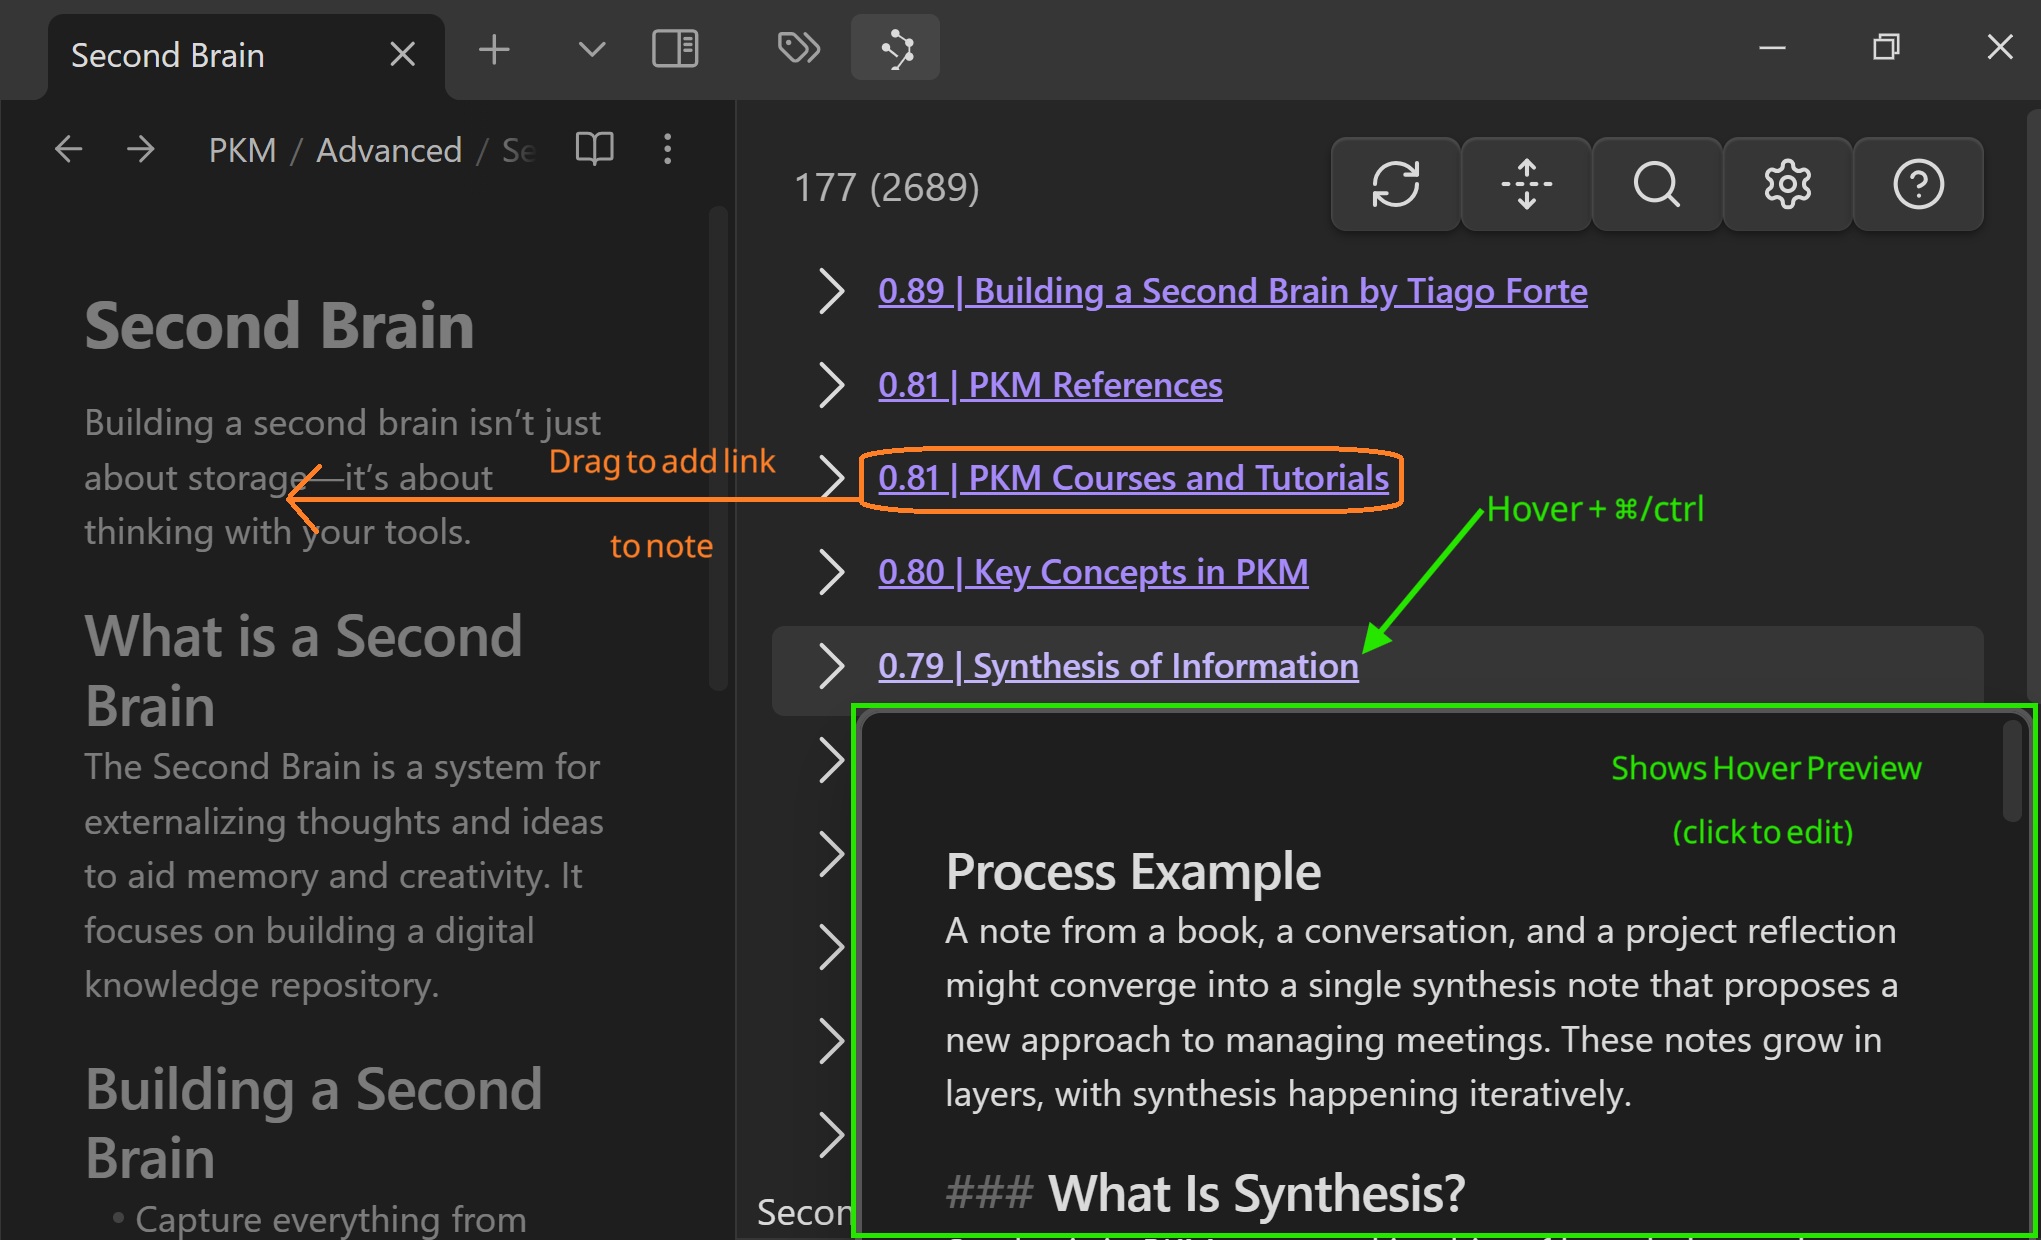
Drag any result into an open note to insert an Obsidian link.
Use this to build link trails while you write, not as a separate cleanup session.
2) Preview before you commit (confirm relevance without losing flow)
Hold Cmd/Ctrl while hovering a result to open Obsidian's native Hover Preview.
Use this to confirm the note is actually relevant before switching context.
3) Pause to hold an anchor steady
Connections updates automatically when you change notes (unless paused).
Use Pause when:
- you are writing and want stable context
- you want to browse while keeping one "anchor note" as the reference point
- you are comparing several candidates against the same anchor
If the list feels stuck, make sure Play is active (unpause) so it refreshes.
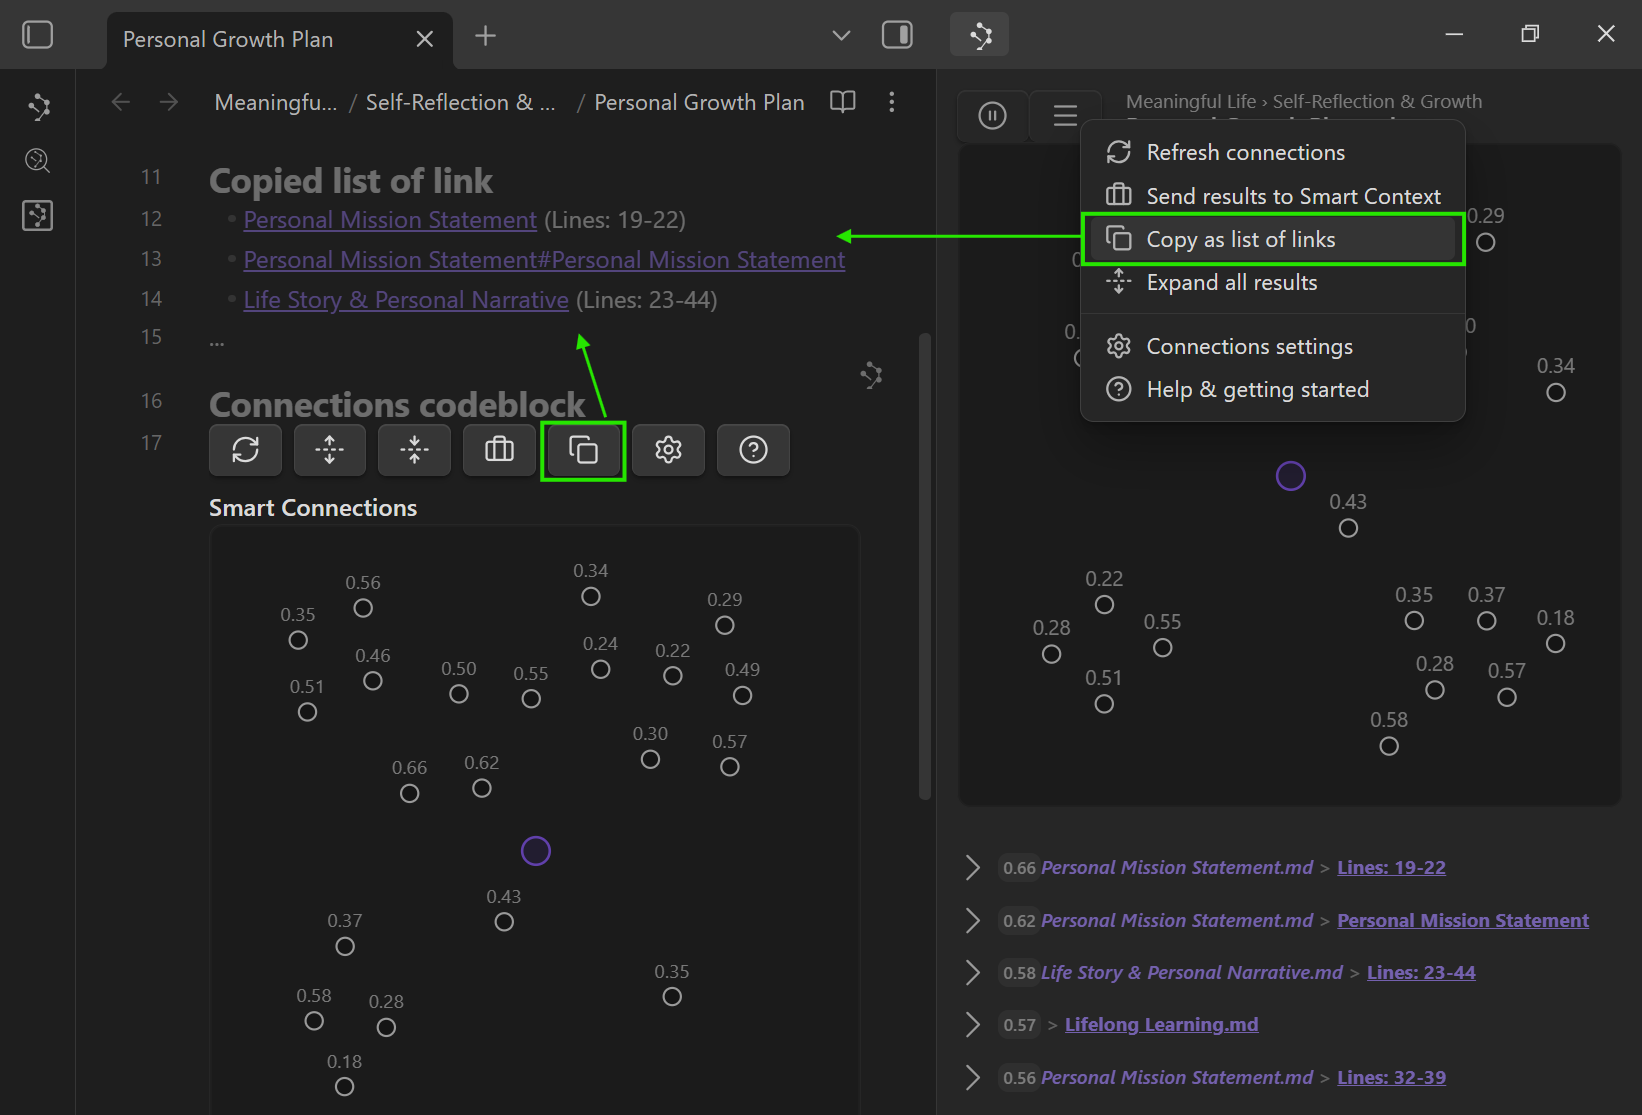
4) Copy as a list of links (instant references section)
Copy the results as a clean list of Obsidian links.
Use this for:
- "Related notes" sections in drafts
- a meaning-ranked reading trail
- project hub updates
5) Send results to Smart Context (AI-ready grounding)
Send results to Smart Context to curate a high-signal bundle for Smart Chat or any AI tool.
Workflow:
- Pause on your anchor note
- Send results to Smart Context
- Remove noise, reorder what matters
- Copy the final bundle and ask for an outcome
Related:
- https://smartconnections.app/smart-context/clipboard/
- https://smartconnections.app/smart-context/builder/
Understanding the list (what to pay attention to)

Play/Pause updates (Play/Pause)
Play/Pause controls whether the list updates as you change notes.
Use Pause when:
- You are writing and want stable context
- You want to browse while keeping one "anchor note" as your reference point
- You are comparing several candidate notes against the same anchor
If the list feels "stuck," make sure Play is active (unpause) so results can refresh as you switch notes.
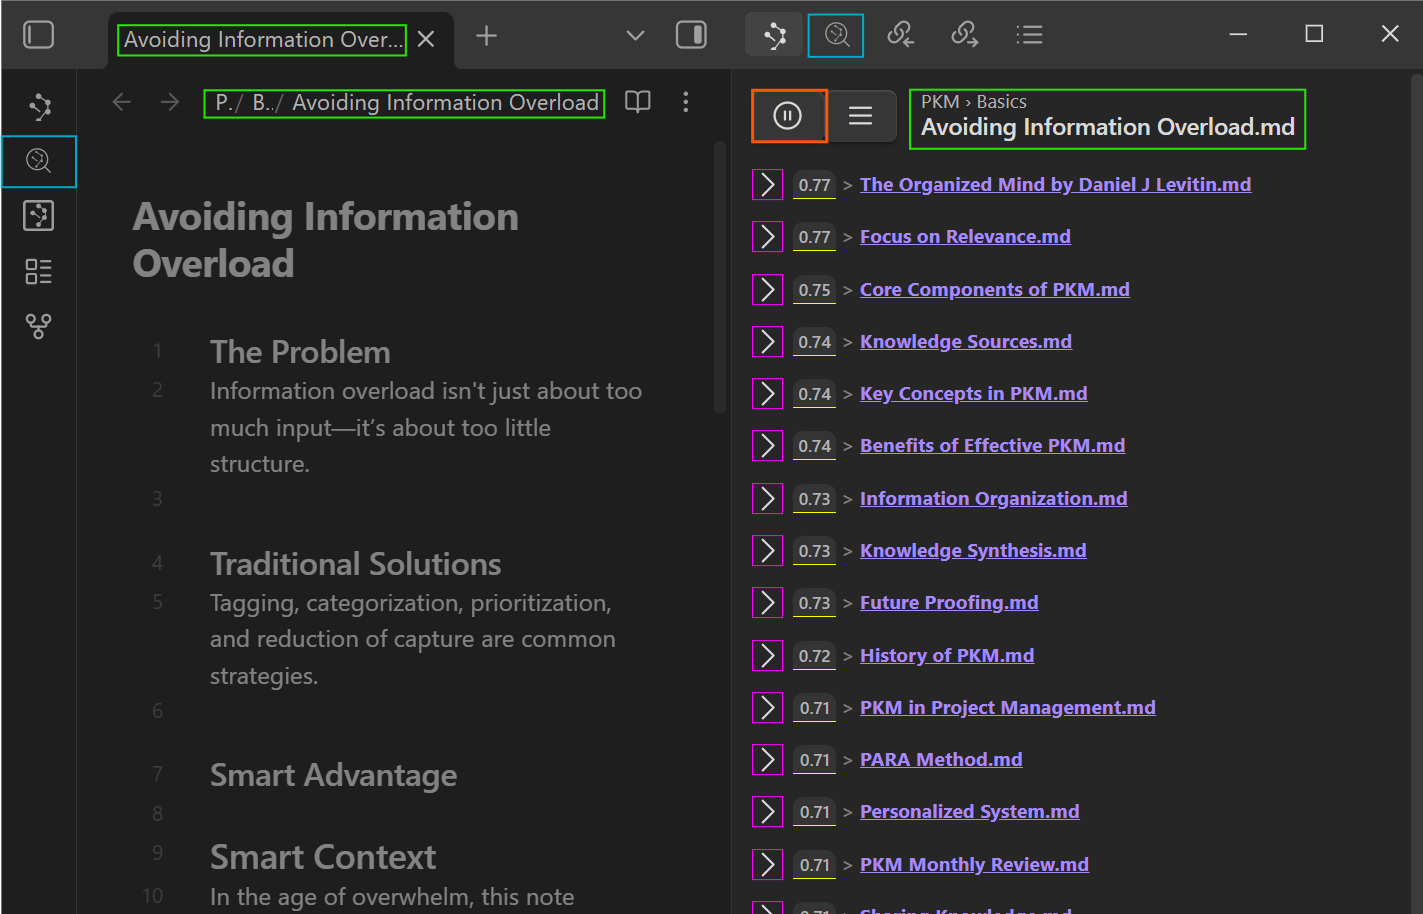
Score (yellow underlined)
Higher scores generally mean "more related", but treat the score as a ranking signal, not a grade.
Practical rules:
- Compare scores within the same list (same anchor note), not across different notes.
- Score ranges vary by vault content and embedding model.
- If results feel broad/noisy, tune Sources vs Blocks, limits, and filters in the settings.
The score algorithm uses an industry-standard comparison (cosine similarity) by default. Pro users can choose additional scoring and ranking options.
Expand/collapse (Show/hide)
Expand a result to preview content without opening the note.
Use it to scan faster and avoid context switching.
Click behavior
Clicking a result follows Obsidian's default link behavior:
- Click: open in current pane
- Cmd/Ctrl + click: open in new tab
- Cmd/Ctrl + Alt + click: open in a new pane (split)
Managing noise: Hide and Pin
As your vault grows, some connections will be technically related but not useful right now.
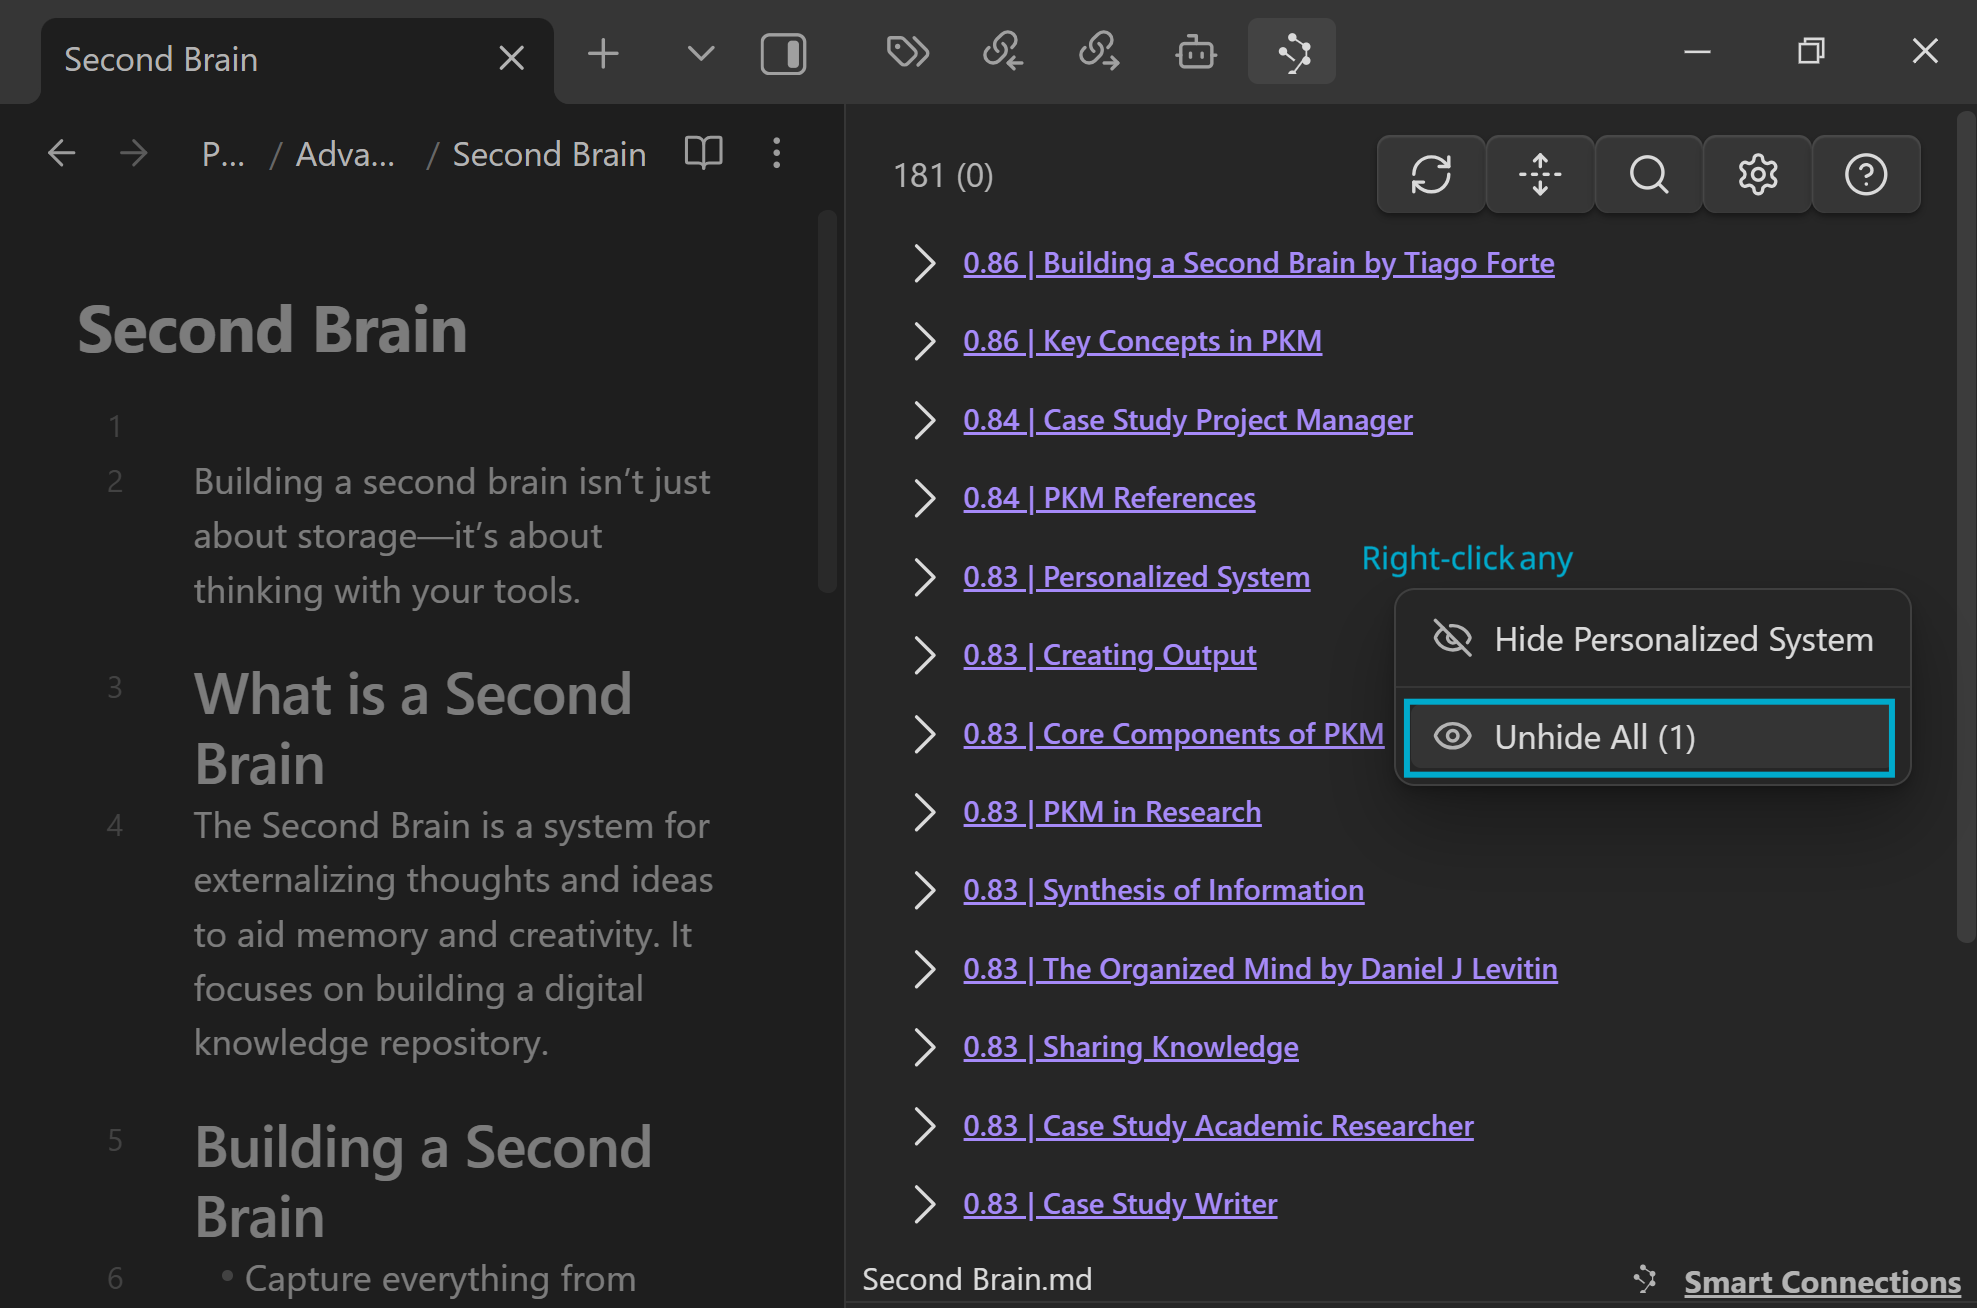
Hide
Hide removes a noisy result from the list.
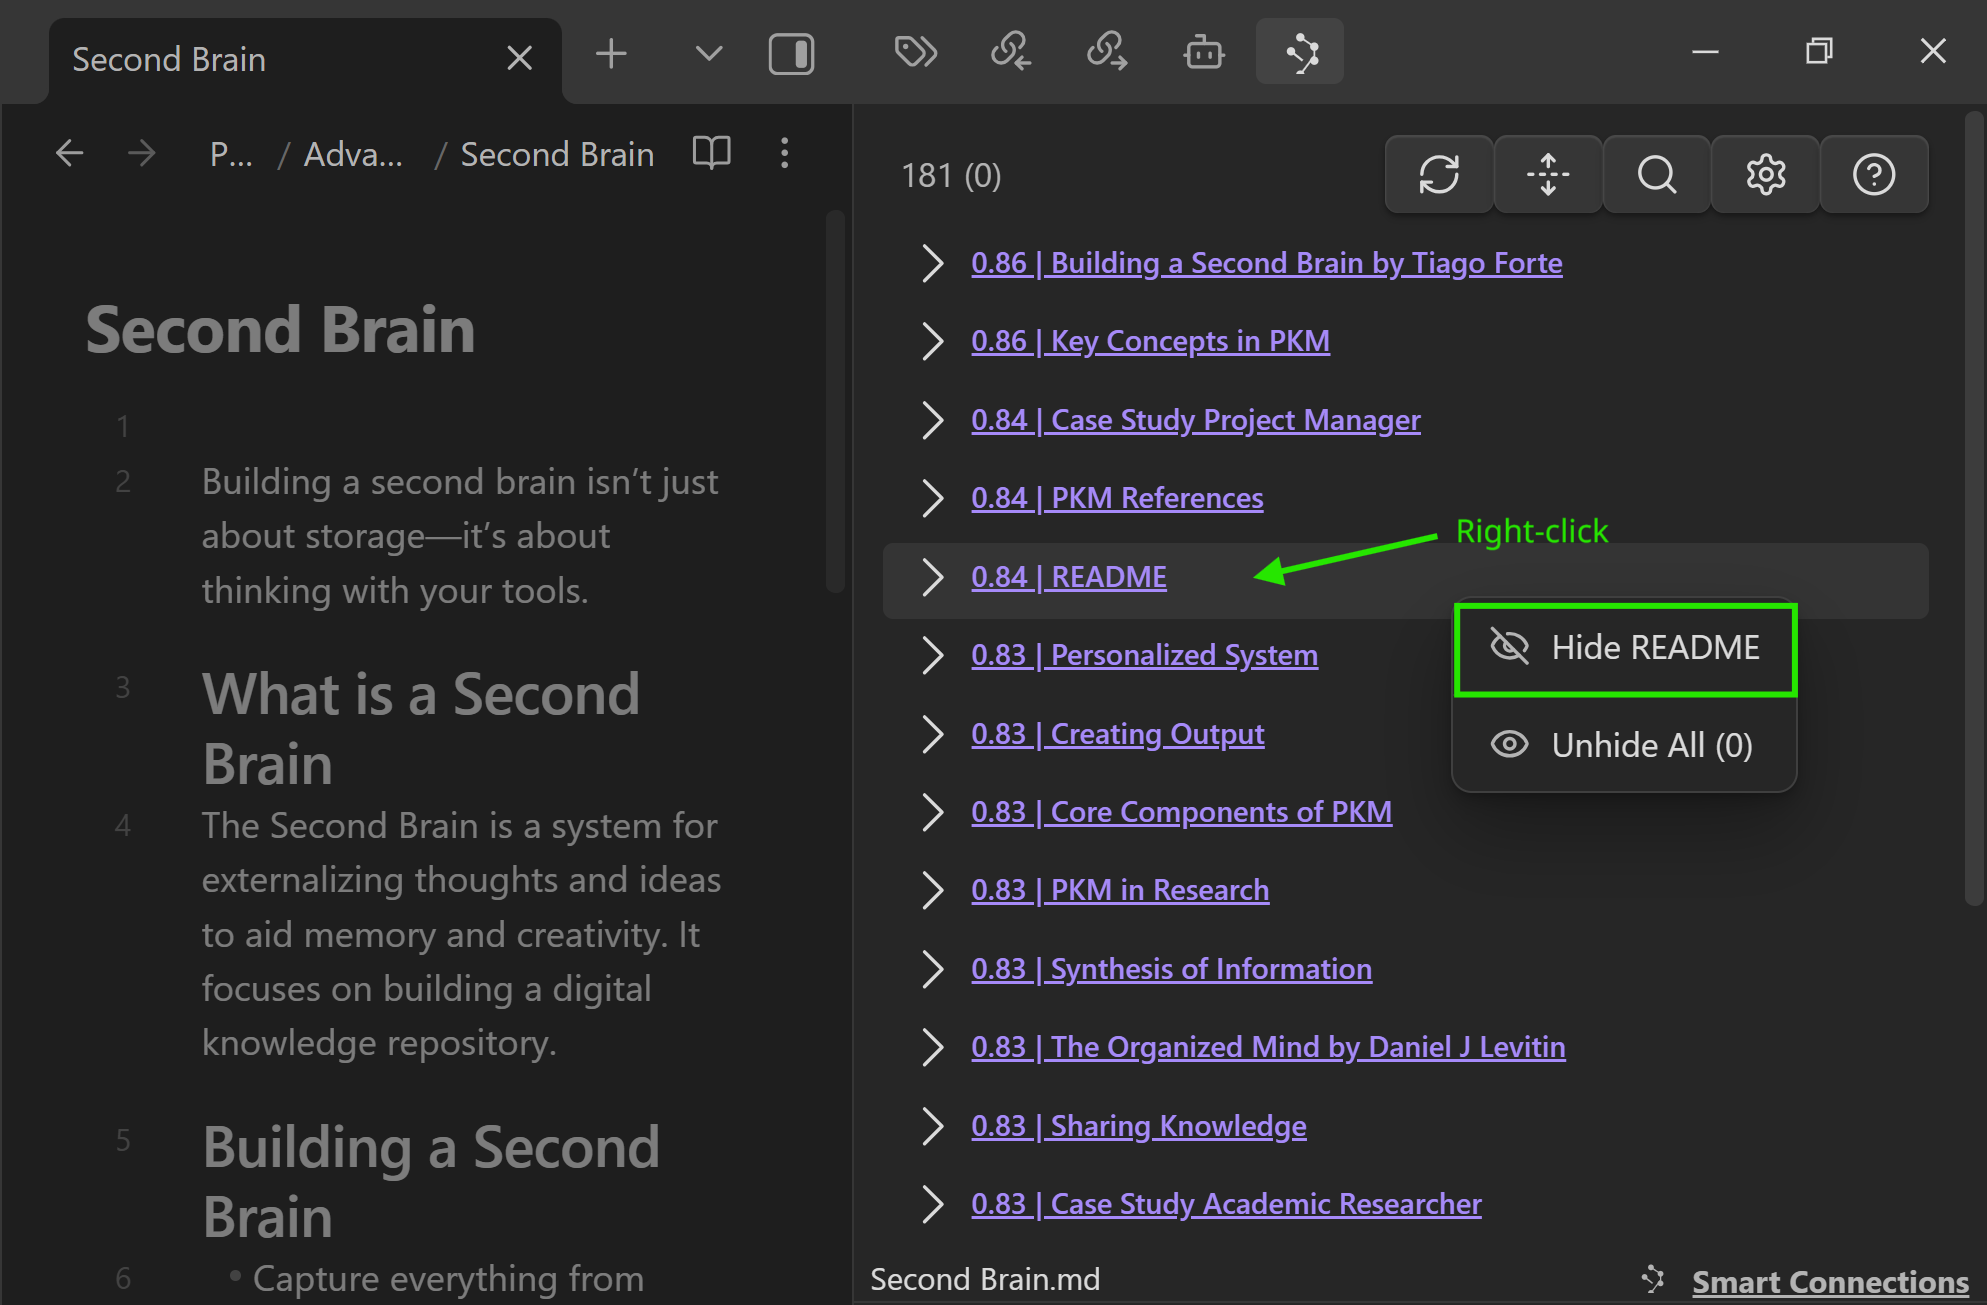
Use hide when:
- a note is a frequent false positive
- a template/index note pollutes results
- the topic is adjacent but not relevant to the current task
Pin
Pin keeps an item visible as a stable reference.
Pinning is useful when:
- one reference must stay visible while you browse
- you want a small set of "always relevant" notes for this session
In Connections Pro, pinned and hidden signals can also shape ordering for some algorithms.
List controls (menu actions)
The menu contains the controls that turn scanning into action.
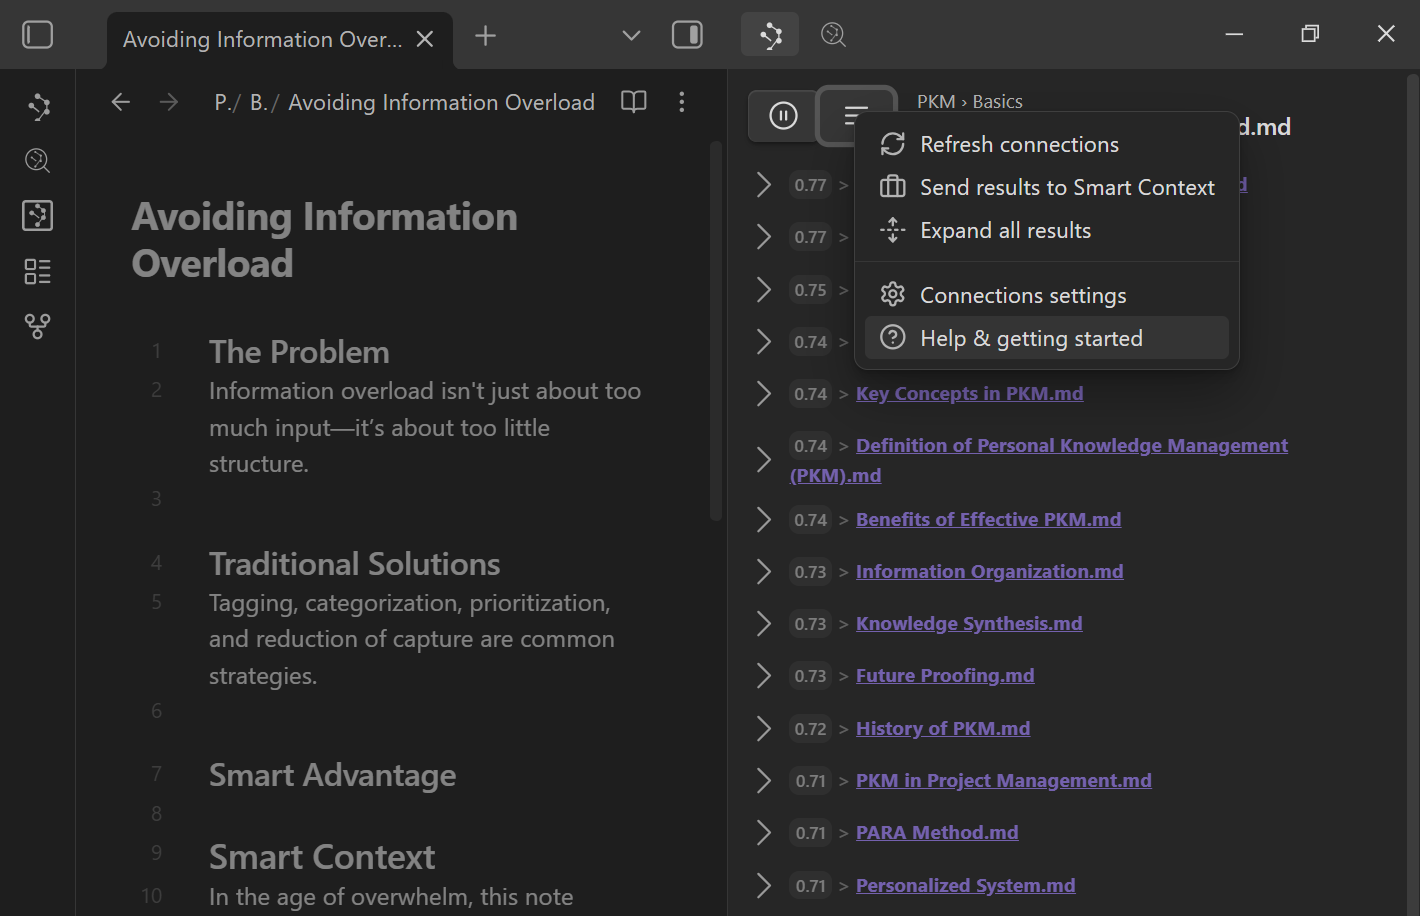
Refresh
Refresh recomputes results for the current note.
Use it when:
- You made major edits and want updated relationships
- You changed settings and want to re-run the list
Send to Smart Context
Send results to Smart Context is the fastest way to turn your Connections list into high-quality AI context grounded in your own vault.
A practical workflow:
- Pause the list on the note you are working on.
- Send results to Smart Context.
- Remove anything noisy and reorder what matters.
- Copy the final context to your AI tool.
Learn more:
Copy as a list of links
Copies the results as a simple list of Obsidian links.
Use it to:
- create a "related notes" section
- build a reading trail
- paste into a project hub as a ranked reference list
Quick controls cheat sheet
| Control | What it does | When to use it |
|---|---|---|
| Play/Pause | Stop or resume automatic updates | Keep one anchor note steady while you browse. |
| Refresh | Recompute results | After major edits or settings changes. |
| Copy links | Copy ranked links | Add a clean related list to a draft. |
| Send to context | Send results to Smart Context | Build AI-ready context fast. |
| Hide/Pin | Remove noise or lock essentials | Reduce clutter or keep key references visible. |
Connections displays (same loop, different surfaces)
The default Connections list lives in the sidebar. Pro adds additional surfaces that keep the same scan -> confirm -> act loop, but move it closer to where you work.
| Surface | Best when | Main strength | Learn more |
|---|---|---|---|
| Sidebar list | You want the default note-first workflow | Best all-around scan -> confirm -> act loop | This page |
| Graph view | You think spatially and want clusters | See neighborhoods and bridge notes | Connections settings |
| Footer connections | You want suggestions while drafting | Keep related notes in view without managing a side panel | Connections settings |
| Inline connections | You want relevance beside the exact paragraph you are editing | Retrieval stays closest to the writing surface | Inline connections |
| Smart Lookup | You have a question first, not an anchor note | Query-first semantic discovery | Smart Lookup |
Graph view (Pro)
If you think spatially, enable the graph view to explore clusters of related notes.
Use the graph to:
- visualize neighborhoods of ideas (clusters)
- spot dense regions (many related notes) vs sparse ones
- find bridge notes that connect two clusters
To enable it, set Connections List Component in Connections settings to "Graph + List".
Footer connections (Pro)
Footer connections place a Connections panel at the bottom of your note so relevant links are always available while you write.
This is especially useful when:
- you want zero side-panel management while drafting
- you are on mobile
- you want quick linking without breaking flow
Enable in Connections settings.
Inline connections (Pro)
See Connections appear alongside content while you write, right inside the editor.

Learn more: Inline connections
Pick your first workflow (fast self-selection)
A) Writing: ground a draft in your existing notes
- Scan top results
- Preview 1-2
- Drag the best into a "Related" section
- Keep writing
B) Research: build a meaning-ranked reading trail
- Pause on your anchor note
- Copy links
- Paste into a "Reading trail" note and work top-down
C) AI work: assemble grounded context fast
- Pause on the note you are working on
- Send results to Smart Context
- Remove noise
- Paste into chat and ask for a specific outcome
When results are wrong (fast fixes)
Do the minimum fix that matches the symptom:
- Too broad / noisy:
- lower result limits
- switch Sources vs Blocks
- add include/exclude filters
- Not updating when you change notes:
- make sure you are not paused
- Relationships feel stale after edits:
- use Refresh
- You actually want query-first search:
- use Smart Lookup instead
- You want connections per paragraph inside the editor:
- enable Inline connections
If you suspect indexing is stale, check Smart Environment settings.
FAQ
How do I refresh or re-embed a specific note?
If results feel stale after major edits, use Refresh in the Connections view first. That updates results for the current note without forcing a full rebuild. If you changed embedding models or want a vault-wide reset, use Smart Environment settings. If you are still on first run, verify indexing in Getting Started.
Does Smart Connections replace backlinks?
No. Smart Connections complements backlinks. Backlinks show links you already made. The Connections view surfaces semantically related notes even when no link exists yet. Use it to find relevant notes, then drag results into your note to turn relevance into links. If you want query-first discovery instead of note-first suggestions, use Smart Lookup. For the flagship overview, see Smart Connections for Obsidian.
Do I need to reorganize my vault first?
No. That is one of the main reasons to use Connections. It helps you discover relevant notes before your vault is perfectly linked, tagged, or foldered. Start with one working note, scan the ranked suggestions, and turn the best matches into links or context. As you use it, your vault naturally gets easier to navigate because relevance becomes structure.