Smart Context Clipboard
You are about to send context to an AI, but you want it clean, predictable, and reusable. Smart Context Clipboard is the fast lane for that moment.
- Pick a source or surface.
- If that surface supports it, choose link depth and backlink mode.
- Copy as text, or use an Pro media-capable surface where available.
- Paste into your AI tool or draft note.
Smart Context Clipboard gives you a few different export paths, and they do not all behave the same way.
Some entry points open a depth chooser before copying.
Other entry points copy the current selection immediately.
Use the matrix below to pick the right surface for the job.
Who this helps
- You want consistent context bundles for AI chats.
- You want to understand which surfaces support depth selection and which copy immediately.
- You care about character budget before you paste.
- You want clipboard output that matches your preferred template format.
- You need images as context (Pro).
Ways to copy context
Smart Context currently has two clipboard patterns:
| Pattern | What happens |
|---|---|
| Modal copy | Builds a linked context first, then lets you choose depth and backlink mode before copying. |
| Direct copy | Copies the current selection or current context immediately, with no depth chooser. |
Command and surface matrix
| Flow | Surface | Edition | Output | Depth chooser | Current behavior |
|---|---|---|---|---|---|
| Current note | Command / ribbon | Core | text | Yes | Builds a linked context from the active note, then opens CopyContextModal. |
| Current note | Command / ribbon | Pro | text or text + compiled image | Yes | Uses the same modal flow, with separate media-capable and text-only commands. |
| Named context | Command | Both | text | Yes | Select a named context, build a temporary linked copy context, then open CopyContextModal. |
| Selected notes | File navigator multi-select | Both | text | No | Copies selected markdown notes immediately. |
| Selected folders | File navigator multi-select | Both | text | No | Expands selected folders to Smart Sources, then copies immediately. |
| Single folder | Folder context menu or folder-picker command | Both | text | No | Copies folder contents immediately. |
| Current Builder context | Context Builder / Context Selector actions bar | Core | text | No | Copies the current SmartContext as-is. |
| Current Builder context | Context Builder / Context Selector actions bar | Pro | text or text + compiled image | No | Buttons are Copy text and Copy media. |
| Current codeblock context | Codeblock toolbar / codeblock menu | Both | text | No | Copies the current codeblock SmartContext as-is. |
| Saved named context row | Named Contexts dashboard row menu | Both | text | No | Copies the saved named context as-is. |
If you need a reusable saved set, use Smart Context Builder.
If you need a tree export instead of bundle text, use one of the separate link-tree copy actions.
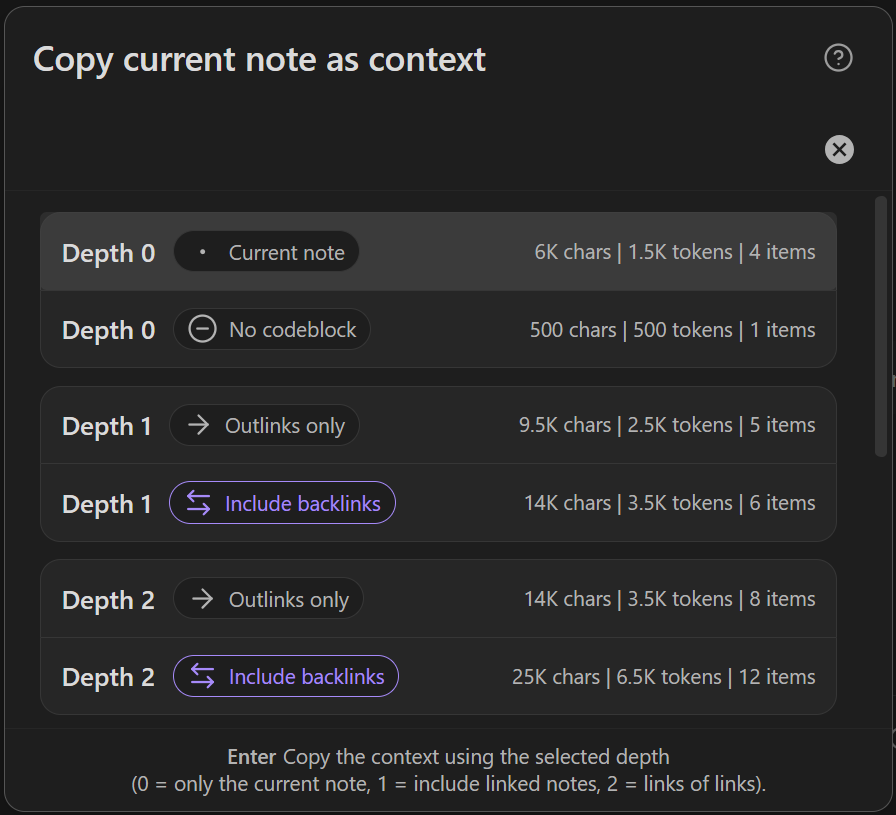
Copy the current note as context
Run the command:
Copy current to clipboard (choose link depth)
Or use the ribbon icon:
![]()
Learn more about copying the current note as context.
Pick a link depth
Link depth currently applies to the modal-based flows:
- current note
- named context
It does not currently apply to:
- selected notes
- selected folders
- folder copy
- direct Builder / codeblock / dashboard copy actions
Depth meaning
| Depth | What is included |
|---|---|
0 |
Only the starting note or starting context items. Embedded links in the starting note are treated as depth 0. Bases embeds in the starting note are also treated as depth 0. |
1 |
Directly linked notes from the starting note or root items. |
2 |
Links of links. |
3+ |
Deeper hops when available in that flow. |
Link direction rows
Each depth is shown twice in the chooser:
| Row type | What it means |
|---|---|
| Outlinks only | Only outgoing links are included. |
| Include backlinks | Incoming links are also included. |
Current limits
| Flow | Current linked depth built before the chooser |
|---|---|
| Current note | up to 5 |
| Named context | up to 3 |
Current stats behavior
The chooser currently shows:
charsitems
The chooser does not currently show:
- token estimates
- per-depth stats in the final confirmation
Copy multiple selected notes
When you want a small hand-picked bundle, use file navigator multi-select.
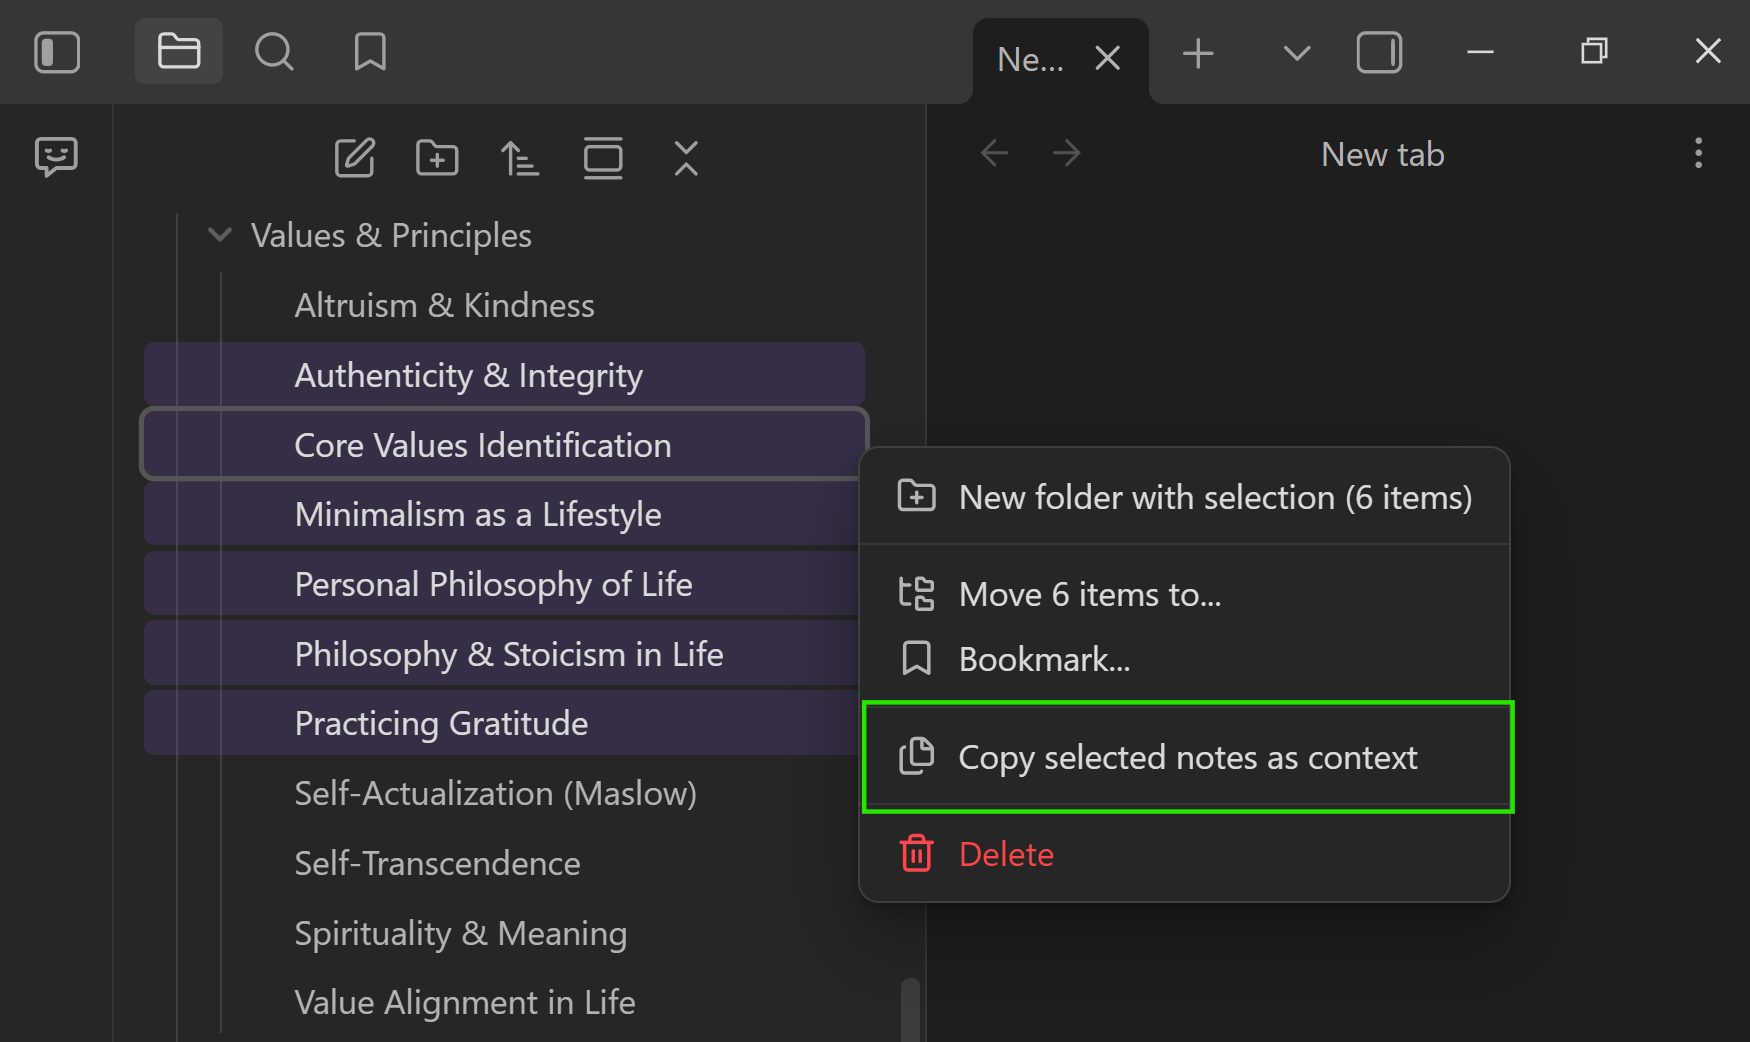
| Selection | Menu action | Output | Current behavior |
|---|---|---|---|
| 2+ notes | Copy selected notes as context |
text | Copies immediately. No depth chooser. |
| 2+ folders | Copy selected folders as context |
text | Expands selected folders, then copies immediately. No depth chooser. |
This is ideal for direct "just these notes" workflows:
- agenda + last meeting notes + decisions
- requirements + constraints + current draft
- bug report + repro steps + relevant logs
If you need depth control, start from a current note or named context instead.
Copy an entire folder
If your project already lives in one folder, folder copy is the fastest direct-copy path.
You can start it from either surface:
| Surface | Action | Output | Current behavior |
|---|---|---|---|
| Folder context menu | Copy folder contents to clipboard |
text | Copies immediately. No depth chooser. |
| Command + folder picker | Copy entire folder to clipboard |
text | Opens a folder picker, then copies immediately. No depth chooser. |
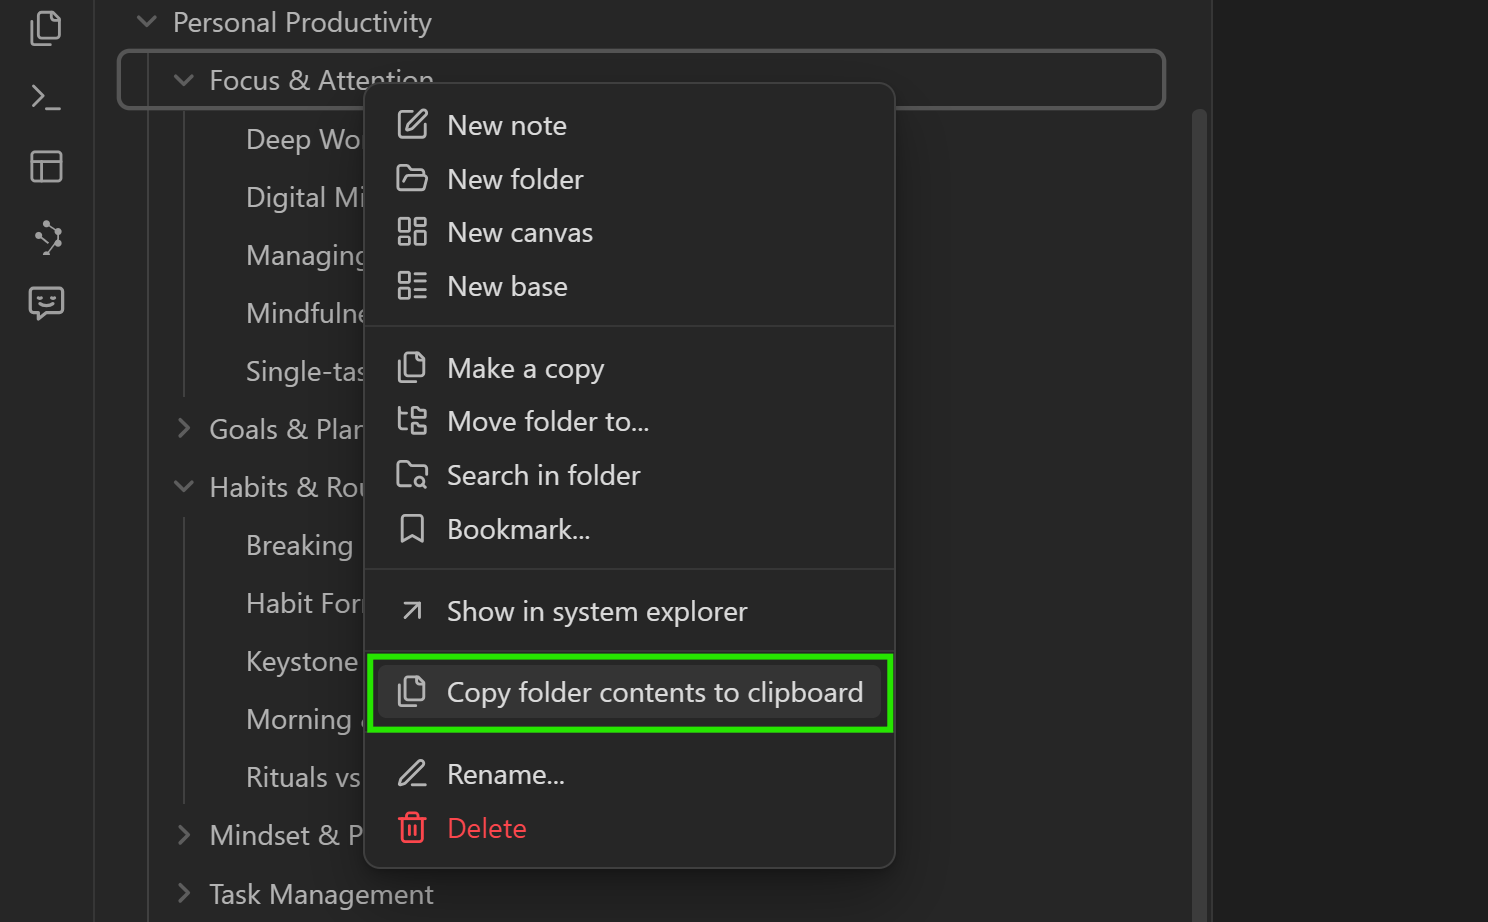
Folder export is best when you want a quick project snapshot and you already know the folder boundary is the right scope.
Folder copy can get large quickly.
If you need tighter control, use:
- a smaller file-nav selection, or
- the current-note / named-context modal flows, which support link depth
Customize what gets copied
Clipboard exports use the Smart Context templates you configure in settings.
That means you can standardize things like:
- how each note is titled in the export,
- wrappers (headers/footers),
- whether to include file paths,
- whether to include a file tree header,
- formatting for block embeds vs whole notes.
If you want your clipboard output to match your preferred prompt format, adjust templates in Smart Context settings.
Workflows to try
Use these to turn clipboard exports into repeatable outcomes.
1) Depth-0 decision draft
- When: you need a quick decision, plan, or rewrite from a single note.
- Flow:
- Copy the current note at Depth 0.
- Ask: "Use only this context. Return a decision + 3 next actions."
- Paste the answer back into the note under
## Decision.
2) Linked-notes brief (Depth 1)
- When: your note links to supporting docs and you want a concise brief.
- Flow:
- Copy at Depth 1.
- Ask: "Summarize the topic, list assumptions, then flag missing info."
- Save the brief as a
## Briefsection in the hub note.
3) Folder pulse check
- When: you want a status snapshot of a project folder.
- Flow:
- Copy folder contents.
- Ask: "Summarize progress, risks, and top 3 next actions. Cite note titles."
- Paste into your weekly project pulse note.
4) Visual review (Pro)
- When: diagrams, screenshots, or PDFs are required for reasoning.
- Flow:
- Choose Copy with media.
- Ask: "Reference both the text and images. Call out visual gaps."
- Log the review outcome in the source note.
Troubleshooting
"My paste is too large"
- Reduce link depth.
- Use multi-select instead of folder copy.
- Remove heavy wrappers in templates (and consider removing file tree).
- Switch to Builder if you need block-level precision.
"Token estimate does not match my AI tool"
Tokenization differs across models and vendors. Treat the estimate as directional.
"Images/PDFs did not paste"
Use Copy with media (Pro) and confirm your target tool supports pasted images. If it is text-only, use Copy as text.
If attachments are missing, embed them in the starting note for Depth 0 or increase link depth so linked media is included.
using ChatGPT? Sometimes images aren't pasted into the chat if there is already existing text. Try pasting after removing all text from the input box.
Related pages
- Build precise sets before copying: Smart Context Builder
- Add semantic discovery to your selection flow: Exploring the Connections view
- Start from a question and then copy results: Smart Lookup
- Keep copy output aligned with your configuration: Smart Context settings